Using WordPress/Cloudflare I wanted my website webserver to be hit as infrequently as possible and have most of the traffic that visits my site hit Cloudflare and serve as little repeat requests as I possibly can from my end.
I embarked on a journey to enhance my site’s performance significantly by having Cloudflare serve as much of it as possible and although Cloudflare has it’s disadvantages it’s generally pretty good as a global point of presence. For WordPress I used plugins W3 Total Cache, and Debloat: Optimize, achieving markedly improved load times but there was a bit of trial and error, these are good caching tools for my site, but only really good for people local to me (because Cloudflare has a global delivery network), so I also stuck Cloudflare at the edge to serve the page.
The performance improvement is good, and can be as low as 90ms from what was previously a few seconds (around 1.4-1.6 seconds when served directly from my webserver to a London VPS).
Leveraging Cloudflare’s Proxying and Caching
Cloudflare has a pretty good content delivery network (CDN) that offers caching and proxying services. Here’s how I set it up:
By routing my traffic through Cloudflare’s servers.
In the Cloudflare dashboard, I set a page rule to cache everything with a Time-To-Live (TTL) of one month. This caching strategy means that once a resource is cached, it stays cached for 30 days.
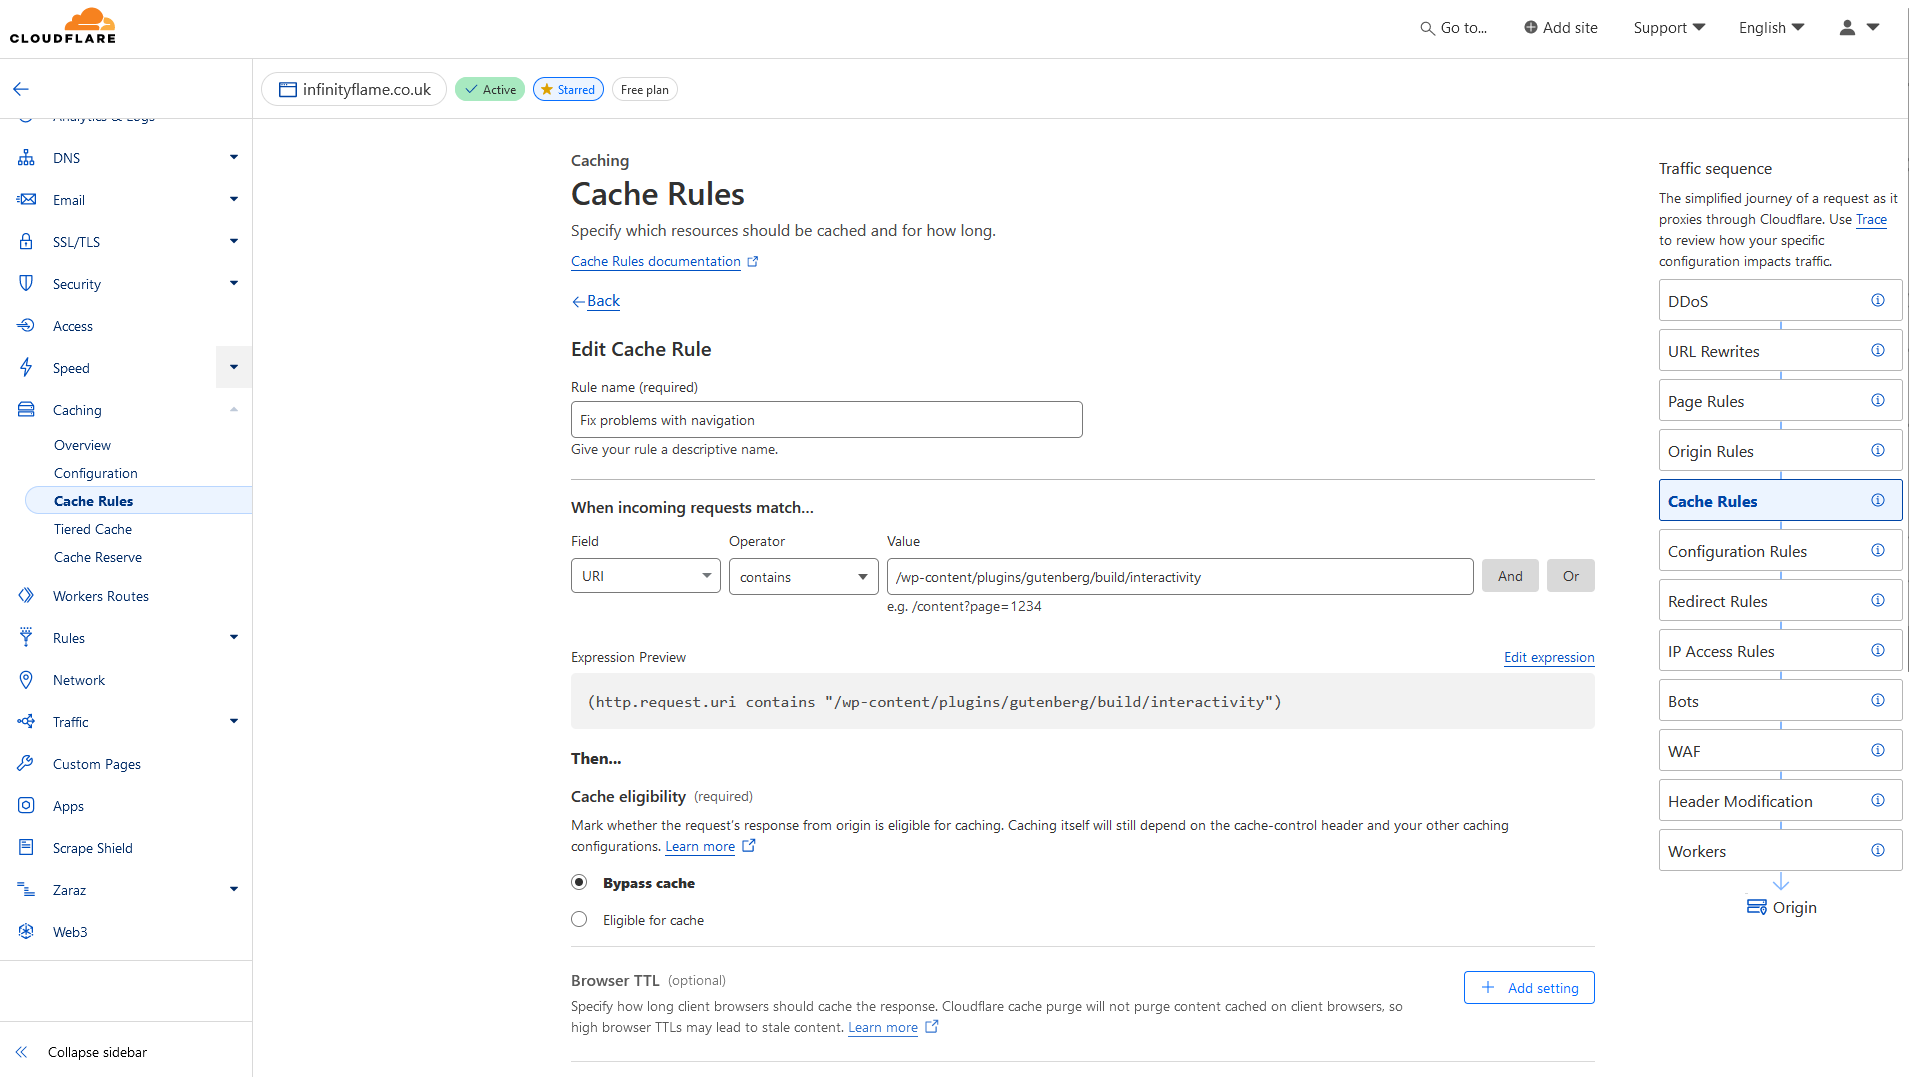
On the free Cloudflare plan the Cache Rules are limited to 10 rules per site. I set my rules to cache the whole site, but exclude any incoming requests with the WordPress Cookie. This would be problematic for any large sites with a lot of logged in users, but I don’t have any so perfect for me. I also set up a rule to exclude caching some of the Gutenberg plugin build css/js to fix issues with navigation. For anonymous users, the aggressive caching remains in effect, delivering cached content for optimal speed.
Development Mode for Testing
While configuring caching, I tested changes without caching interfering by using Cloudflare’s Development Mode to temporarily bypass the cache so I could see realtime changes when tweaking the W3 Total Cache settings.
Once I had everything working, and realised what was broken, I excluded broken plugin files from caching and minification and then enabled the caching on Cloudflares end.
Using these two plugins, I would then look at the page source and CF-Cache-Status headers to see the new response speed and lighthouse performance.
A common pitfall is to just cache everything, you will probably find you can’t login or parts of the site don’t work, so its important to triall and error the site, go through it’s features and understand what doesn’t work and needs to be excluded from minification in the CSS and JS, especially for plugin heavy sites.
Caching and Performance Optimiziation
For WordPress Caching I used the plugins W3 Total Cache and Debloat because they were on the plugin store and free, which was all I cared about really.
Where possible I serve static HTML versions of my pages. This is to reduce PHP execution time and database queries, resulting in faster load times.
That was basically all I needed W3 Total Cache for . All of the minification of JavaScript and removal of CSS that wasn’t used in my themes etc I used Debloat over W3 Total Cache. Although in hindsight W3 maybe could have done this role too.
When the site loads and you aren’t served any caches (Cache MISS etc), you obviously get a lot slower response as the caching and minification is compiled and served, so your time to first byte is abysmal, but after that Cloudflare should have a cached copy to serve in as little as a few miliseconds.
It would be extremely better if I removed the advertising code to take some of the compute off the main thread, and all the cookie notice stuff but I won’t for money reasons sorry.
I recently purchased a Seagate Exos X16 from Amazon. To be specific it was this one for £188.90. I was cautious that the vendor was not Seagate and was a third party seller for a reduced rate, so I thought it best to check the smart values and serial number after it arrived as usually this means the drive is of questionable origin.
At this price point I knew I was taking a bit of a gamble (and S.M.A.R.T data can be overwritten I think) but the data would hopefully provide some insight into what I had actually purchased. £188.90 is significantly below the £214 buy box, but it is not impossible that the drive didn’t come from Seagate as sold.
When it arrived I took a photo. Packing was clearly custom and the ESD bag was not OEM. Oh well, lets see what smartctl says.
Running the disk drive through Seagates warranty checker, the drive is likely from one of their storage appliances. This makes warranty replacement not possible except when done through the Amazon seller’s original equipment.
I also plugged the drive into my Proxmox NAS to see if the drive had been running at all and given the S.M.A.R.T attribute (240 0xF0 “Head Flying Hours”) it looks like the drive has never been started as it has only been up about the time it took me to run the command after connecting the drive.
[email protected]:~# smartctl -a /dev/sdc smartctl 7.2 2020-12-30 r5155 [x86_64-linux-5.15.136-1-pve] (local build) Copyright (C) 2002-20, Bruce Allen, Christian Franke, www.smartmontools.org
=== START OF INFORMATION SECTION === Model Family: Seagate Exos X16 Device Model: ST16000NM001G-2KK103 Serial Number: ZL2EPPX1 LU WWN Device Id: 5 000c50 0c9385ca4 Firmware Version: SN03 User Capacity: 16,000,900,661,248 bytes [16.0 TB] Sector Sizes: 512 bytes logical, 4096 bytes physical Rotation Rate: 7200 rpm Form Factor: 3.5 inches Device is: In smartctl database [for details use: -P show] ATA Version is: ACS-4 (minor revision not indicated) SATA Version is: SATA 3.3, 6.0 Gb/s (current: 6.0 Gb/s) Local Time is: Fri Mar 8 14:55:15 2024 GMT SMART support is: Available - device has SMART capability. SMART support is: Enabled
=== START OF READ SMART DATA SECTION === SMART overall-health self-assessment test result: PASSED
General SMART Values: Offline data collection status: (0x82) Offline data collection activity was completed without error. Auto Offline Data Collection: Enabled. Self-test execution status: ( 0) The previous self-test routine completed without error or no self-test has ever been run. Total time to complete Offline data collection: ( 575) seconds. Offline data collection capabilities: (0x7b) SMART execute Offline immediate. Auto Offline data collection on/off support. Suspend Offline collection upon new command. Offline surface scan supported. Self-test supported. Conveyance Self-test supported. Selective Self-test supported. SMART capabilities: (0x0003) Saves SMART data before entering power-saving mode. Supports SMART auto save timer. Error logging capability: (0x01) Error logging supported. General Purpose Logging supported. Short self-test routine recommended polling time: ( 1) minutes. Extended self-test routine recommended polling time: (1485) minutes. Conveyance self-test routine recommended polling time: ( 2) minutes. SCT capabilities: (0x70bd) SCT Status supported. SCT Error Recovery Control supported. SCT Feature Control supported. SCT Data Table supported.
Based on this I was sold a 5 year warranty but I am not able to claim it should something happen to the drive. As I only use it for infrequent backup I will take on the risk.
You can use docker compose to deploy and manage a Microsoft SQL Server 2022 (or older) database using the Microsoft Artefact Registry (their container registry) and any suitable docker installation.
I am by no means an expert at docker so consider this a leading learner article to get you started rather than something that could be considered best practice. This is my process to developing a database that can run as highly available infrastructure.
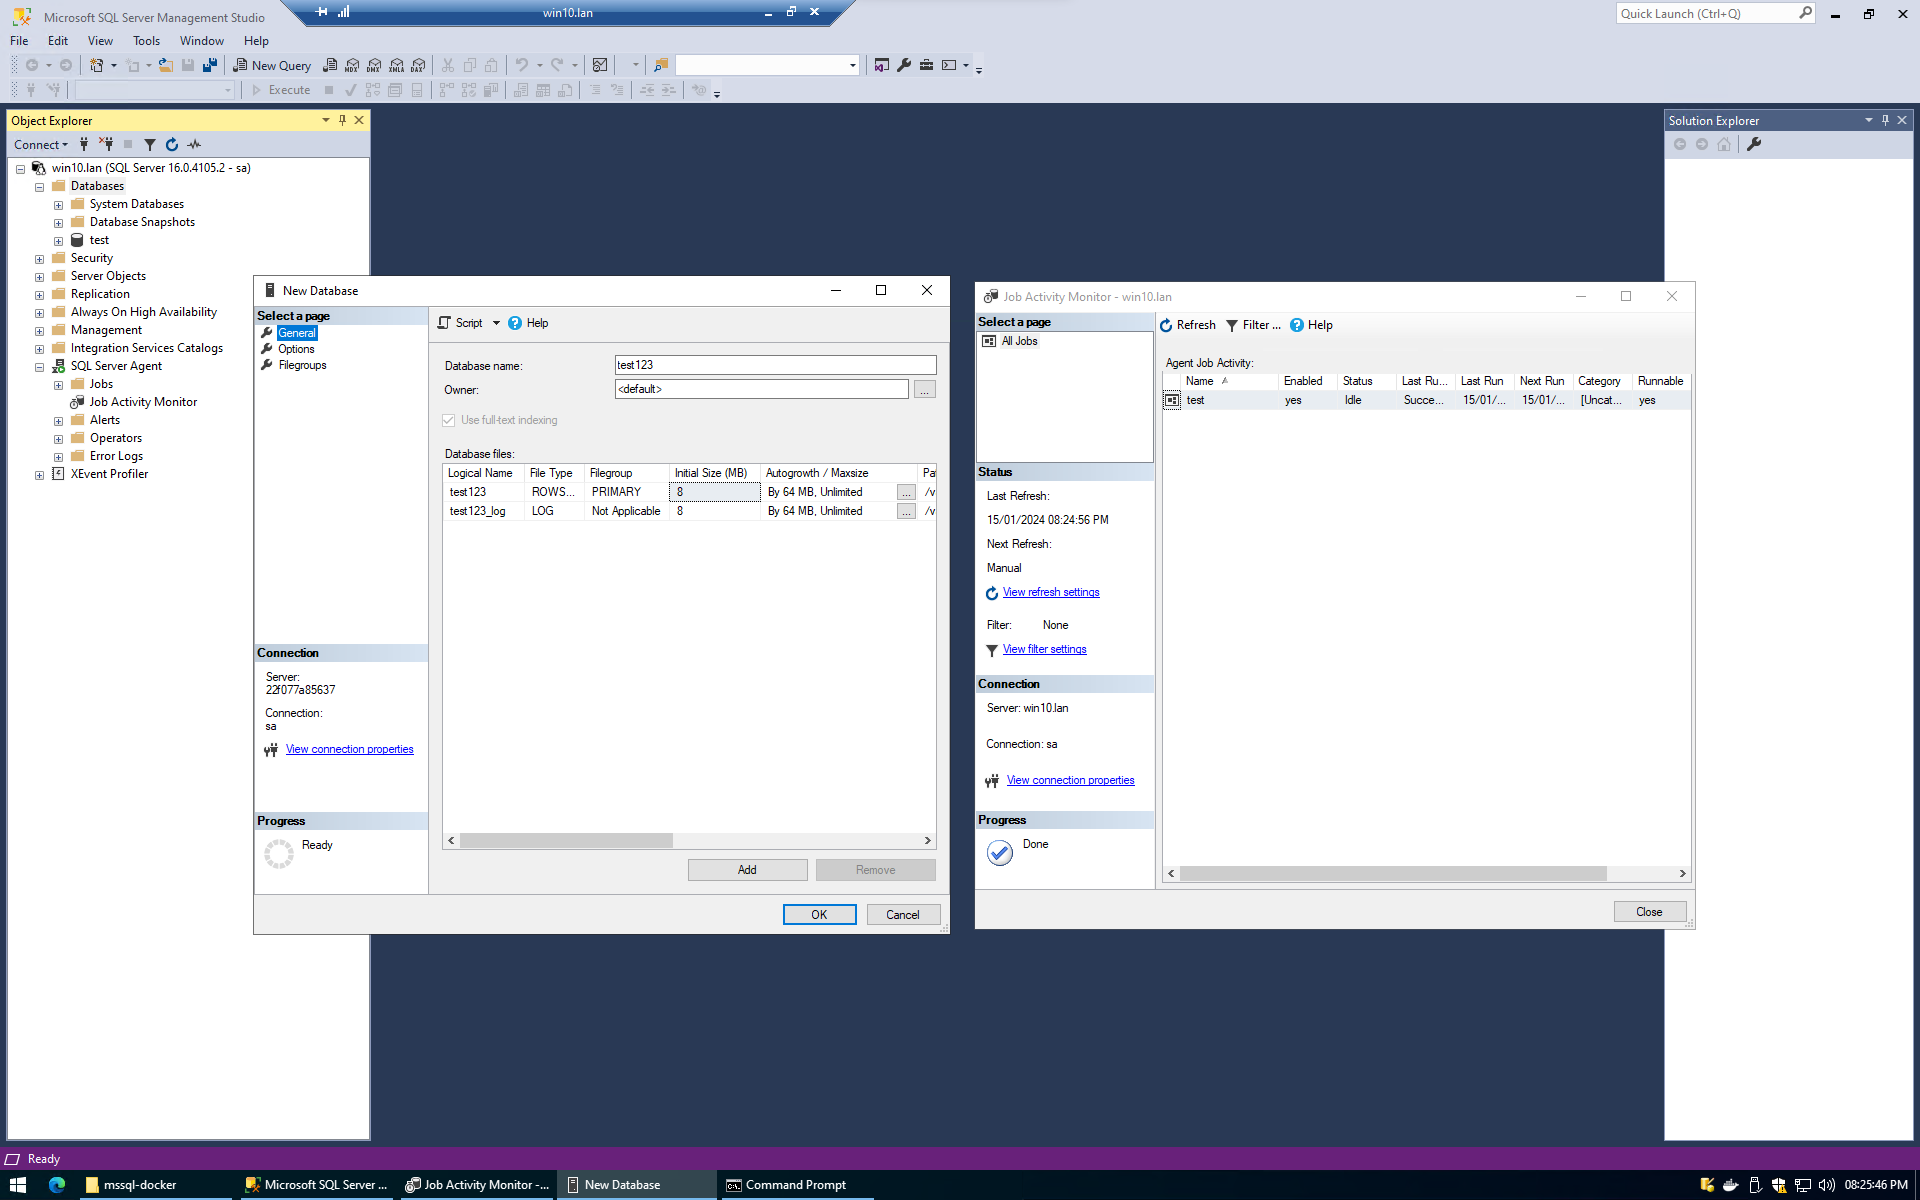
SSMS connected to SQL Server running in docker
Running Microsoft SQL Server in Docker on Windows
If you are running the database on a windows machine, make sure to start WSL using the command line and move your project (or volumes) inside your WSL installation.
I’ve opted for Ubuntu however any Linux distribution is applicable. For best performance you probably would want to run the database on a host directly to avoid any abstraction bottlenecks.
Running the database inside the WSL installation ensures that the mounted volumes are native to the Linux installation and the WSL files aren’t on the windows file system and translated on the fly.
Docker Compose for Microsoft SQL Server 2022
Here is the minimal docker compose file I created for the database. It uses mounts for the database files and a dockerfile to set the permissions. For this installation I did some experimentation with High Availability and it will work with this setup however some additional configuration would be required beyond this compose file to deploy a highly available cluster for redundant DNS. I have also enabled the agent to use scheduling however you may need to pick a licence for your use case using MSSQL_PID.
I’ve also included watchtower to automatically upgrade the database however you may want to remove it if you do not require automatic updating or need a higher uptime.
# Use latest windows 2022 image FROM mcr.microsoft.com/mssql/server:2022-latest
# Switch to root for chown USER root
# set permissions on directories RUN chown -R mssql:mssql /var/opt/mssql
# switching to the mssql user USER mssql
And here is the .env file for the docker secret (the SA password). In future I will use active directory authentication but this should do for testing.
MSSQL_SA_PASSWORD=Badpassword1#
Directory Structure in the SQL Server container
I have laid out my directory structure as follows, if you deploy the docker container yourself it will make the directories (and the files) for you. You need only the .env , docker-compose.yml and dockerfile. Docker will handle the rest.
Once your container database is up you will still need to make the database using SQL Server Management Studio or interact with the database using SQLCMD for your application.
Caveats using this method
Using containers adds a layer of abstraction which may affect performance, this seems to be most notable on windows where the filesystem doesn’t run in WSL’s filesystem.
The volumes are managed by docker so using faster disk may be difficult (or easier) depending on usecase.
You have to pay for an MSSQL licence.
You should put your backups on a different media than your data, which this currently doesn’t do.
There is some additional setup with replication that doesn’t seem to be present on a standard windows installation of SQL Server 2022.
My friends frequently travel once a year to in a large group, this time I thought rather than just contribute traditional party games, I thought it would be worth creating a puzzle with a prize inside. I intentionally waited until the second day to surprise them.
This was what I came up with, a physical box with a QR code on the front that took you to the website to start the box puzzle. No other instruction was given, however inside you could see the smaller box and a wrapped envelope (containing lock-pick tools for the padlocks on the outside of the smaller box).
The physical box contained a wrapped prize which when you eventually unwrapped was a box of Cadbury Heros to share.
The boxes were transparent from B&M with holes drilled in the lids for the locks.
Online Aspect
The QR code took you to a website, 99% of the players used their mobile for all of the puzzle but a few opted for their laptop when working on a few rounds. The web page presented the rules, which were,
You must complete all online activities until you can access the box
Destructive entry into the physical box is not allowed
You may use online tools and websites
Reverse engineering the website is not allowed
Access the box to win
The initial code could be found on a painting used in a previous game we had played.
The website had 5 rounds, each round revealed the next and completing all the rounds showed how to unlock the box,
Reception and Improvements
Here are my observations of how the puzzle went,
Initially the box was extremely interesting, the QR code and website was very interesting to everyone when placed on the coffee table after a long day.
The QR code and website was very accessible and being mobile first during development definitely paid off. There were zero technical or usability issues.
The structure of the website was easy to follow, however I provided a facility to skip ahead on the main page if others got the solution, but this facility was never used because people completed the puzzles by entering the solutions.
Allowing online tools made the first puzzle too easy, it was completed in less than 30 seconds. I could have made this harder or prevented online tools from solving the puzzle.
The second and final (fifth) puzzle was audio based, which meant the music playing had to stop, which disrupted the flow a bit. Audio challenges should be easy or not require silence as these did (a Morse code challenge and audio file to decode an image).
The maze challenge provided the right amount of problem solving, the overall challenge wasn’t too difficult and could be completed by online tools, but still required the human to work out the solution. Similar approaches should be applied in future.
The physical box could only be handled by one person at a time, and took considerable time to complete a lock, lock-picking is also a difficult skill to master, in the end one person completed three of the four locks due to group apathy. I think in future it would be better if the physical box had no physical obstructions once the online part is completed and instead the box opened magically as part of completing the online section, although there is obvious cost to such an approach.
The website was completed in a week, which was a considerable crunch.
Overall, the box puzzle was a success, and next time will be better.
Notes for Next Time
Consider making the first puzzle more challenging or preventing online tools from solving it too quickly.
Make audio-based challenges easier or design them in a way that does not require silence.
Explore ways to allow multiple people to engage with the physical box simultaneously or eliminate physical obstructions once the online part is completed
I had a look on Aliexpress and decided to purchase a Goldenfir 2TB SSD for review from the “Computer & SSD Storage Factory Store” for my Proxmox NAS. I compare it with the Crucial BX500 as I have one on hand too.
Internal 2TB SATA SSD Prices
In total for a 2TB SSD I paid £70.61 which is about £10 cheaper than name-brand SSDs for the same capacity from Amazon. I was skeptical of the price but I decided to test it first before putting it in the NAS.
2TB SSD
Price
Integral V Series (INSSD2TS625V2X)
£89.99
Crucial BX500 (CT2000BX500SSD1)
£98.98
Samsung 870 QVO (MZ-77Q2T0)
£102.97
2TB SSD Prices as of 24/04/2023
Checking the SSD using h2testw.exe
As soon as the SSD arrived I ran it through its paces on h2testw.exe to check that it was real and all 2TB was available. The process took several hours so I just left it running while I was at work.
The SSD passed both the write and verify test. All 2TB is available.
Warning: Only 1907547 of 1907711 MByte tested.
Test finished without errors.
You can now delete the test files *.h2w or verify them again.
Writing speed: 85.0 MByte/s
Reading speed: 339 MByte/s
H2testw v1.4
The Goldenfir 2TB SSD in CrystalDiskInfo
I also opened the SSD in CrystalDiskInfo, which confirmed it was brand new if anything. It did have a power on presumably from the factory during testing.
Goldenfir 2TB SSD in CrystalDiskMark
I ran the SSD through CrystalDiskMark, the most crucial test to me as it would show how it compared to other SSDs.
Goldenfir D800 SSD 2TB
It looks like the SSD performs only slightly worse than the Crucial BX500, Tested using an external USB enclosure.
Here is a comparison with the Crucial BX500.
Crucial BX500
And for fun here is a comparison with the Crucial MX100 from 2014.
Crucial MX100
My Review and Closing Thoughts
Overall, I’m happy. It performs slightly worse than competitors but it’s negligible and I am comfortable keeping the SSD forever so I am not too worried about secure erase.
I am moving this website from Vultr to my Proxmox Ryzen 5 3600 virtualization server at home because it is cheaper and I no longer need to host my applications externally.
To protect my home network, I isolated the web server from my home network traffic. This way, even if the website is compromised, my home network will likely be safe from any attacks.
The server doesn’t require much to run. It has run on almost always the cheapest hardware/software available on various cloud platforms for years.
The main problem was that I didn’t get around to making a VLAN to isolate traffic at a network level from my home network.
Having a VLAN allows you to isolate networks, which I will use to split my home network and the network used by the web server VM.
You can read more about my home network here but it needs a bit of an update.
Preparing a backup of WordPress
This website runs on WordPress. WordPress makes backup/restore easy as import/export tools are built-in.
To keep costs down, I have a small WordPress site. Jetpack (I think) compresses and serves images, and almost all media is not hosted on the VPS directly.
I will need to simply download everything from the admin panel and then upload it to the clone.
I also want a new copy of WordPress because it’s been a while, my first article is from 2014 for example.
Setting up a Home VLAN for the VM
I have a VM running on my home server and disallow the VM to communicate with other devices on my home network but allow access to the internet.
External devices are prevented from being able to connect to the VM using my Ubiquiti router firewall.
I have a few VLANs going around the house so it was just a case of passing the new VLAN over ethernet tagged with its regular traffic to the VM and then using Proxmox to connect the VM using the same tag.
Configuring Proxmox to use the Tagged VLAN Trunk
Because I have not used a VLAN before to tag traffic to Proxmox. All of my previous VMs used the same network as Proxmox.
I was able to set the port the Proxmox server used as both a tagged trunk for VLAN 70 and an untagged on VLAN 20.
The way my home network is set up, all LAN traffic arrives at my switch on VLAN 20 and then VLAN 20 is untagged to devices such as my server.
Non-VLAN 70 VMs will be able to access VLAN 70 traffic but not vice versa. I am okay with this as I trust my home VMs.
I hope you enjoyed reading as much as I enjoyed setting this up.
The U8 Smart Watch was a grey label smart watch from 2015, its dated in comparison to modern smart watches but was a relatively cheap alternative to other watches like the Samsung Gear S2, Apple Watch and the Pebble branded watches from that time.
The watch came with a companion app that was not downloaded from a store but was available from an FTP site, likely due to the fact it would send data back to its creator, IT news site TheRegister reported a year into owning mine.
Since then it has sat in a drawer and I thought it is about time I dug it out and opened it up, before disposing of it.
The U8 Smart Watch
I tried turning it on but it was flat, and it would not take a charge because the battery had dropped below the lithium battery protection boards minimum threshold.
In order to get the U8 Smart Watch to work, I’d need to open it up and power the battery terminals manually to allow the watch to accept a charge.
Opening the U8 Smart Watch
On the back of the watch was a metal plate, removing it revealed four small screws which I removed, then I removed the watch from the housing and applied 3.3V directly to the pads of the lithium battery, which allowed the watch to turn on.
I then plugged in the watch and saw on my meter it was taking a charge, so removed the supply. The watch screen lit up as it had done back in around 2015.
Unfortunately, without the companion app, the watch is mostly useless, I tried connecting to my phone’s Bluetooth but the pairing would always fail.
U8 Smart Watch Pairing
I turned the board over to reveal the insides,
The smartwatch featured a nifty MediaTek MT6260DA processor, and I am not going to pretend to know if that is any good, but it certainly fulfilled its purpose at the time. I was able to find a draft PDF dating the processor back to December 2012.
Attached to the board was a speaker, vibrator combo unit for incoming messages and notifications. I think if I remember correctly you could make calls on the device.
It had a 180mAh lithium battery and charged over USB, had a small but very usable screen and in general the apps that ran were slow but acceptable. Notifications that had a progress bar would often buzz for periods of time until it was complete.
Anyway, so long… Into the bin, unfortunately without good conscience I cannot allow this watch to see the light of day again and it means I don’t have to put it back together.
When I first started using Proxmox one thing I wanted to understand was the schedule grammar for backups.
Most of my backups aren’t handled in Proxmox but I did want a quick way of backing up my Minecraft server and as I had a slow 1TB disk attached to Proxmox I thought it worth trying.
When backing up its worth observing the 3-2-1 rule. 3 backups, 2 different media, 1 copy offsite. This backup wasn’t just about retaining data in case of loss, it is to facilitate rollbacks in case of irreversible damage or corruption to the server, or a dodgy configuration change.
Because I wanted lots of points in time to roll back to, I used Proxmox over OpenMediaVault, my usual go-to.
Setting Proxmox Backups
Proxmox handles backups from the Datacenter level, in the proxmox administration dashboard on the left hand side, select Datacenter, then click on the Backup tab.
From the backup tab you should see the backups that have been scheduled. Here we can see my minecraft backup jobs loaded.
I found the job schedule difficult to understand when the next few occur. I found through the documentation that you can check the backup iterations through systemd-analyze.
Checking Proxmox Backup Schedules
The easiest way to check your backup schedule is by using the schedule simulator on the far right of the backup configuration area.
If you want to look ahead at proxmox backups to see if you have the right schedule set up, you can also use the command below, replacing the last part of the command with your desired schedule in the shell prompt.
This is because backups work through a version of systemd time specification.
The screenshot above is in Ubuntu’s Terminal but you can run it in the shell on the Promox dashboard directly.
You can check the time of the next backup by altering the iterations argument as required. Once you’ve got the schedule as you need, alter your job (or make a new one).
Make sure to set the retention period correctly, if you specify a retention period in weeks, only the latest backup that week will be kept.
One change I made to the schedule was keep-hourly=24, keep-weekly=2 rather than keep-hourly=168 in the screenshot to keep 24 hours of backups (limited to the timings of my schedule) and lower the fidelity of backups to a weekly basis after 24 hours to reduce storage consumption. See the documentation as it’s explained better there.
You may have used TikTok’s digital well-being feature to limit screen time and reduce the amount of time you actually spend on TikTok.
Although TikTok offers the ability to be notified when you spend a considerable amount of time on the app and provide breaks in 10, 20 or 30-minute intervals there are some deceptive and likely intentional behaviours to keep you on the app.
When the app is set to restricted mode at the top of the app there is a message that reads “Restricted Mode” and although some viral videos were identified and restricted, others were not.
“Restricted Mode” videos also did not filter out swearing, fights in shopping centres and adult themes like sex and alcohol.
Time to take a break?
When the screen time limit is reached, a message appears like this,
TikTok Time to take a break? Digital Wellbeing Dark Pattern
Although the pop-up suggests you leave the app, it only partially obstructs the content and offers the option to “Snooze” or press OK.
You can tap anywhere on the screen and it will cause the pop-up to close and you can continue to use the app.
It would be better if the application obstructed the content better or only allowed the next video if the allotted time does not run out before the well-being timer elapses.
This behaviour provides a hook to keep users engaged for longer and encourages dismissing the message, rather than leaving the app.
Screen Time Management
TikTok Screen Time Management
Screen time management also offers no incentive to leave the app and the code has infinite retries with no timeout.
TikTok Screen time management offers infinite retries
Androids native digital well-being application is more effective (though has its own issues) by disallowing the user to open the app when the timer is reached.
When a user reaches the timeout on the TikTok app, if they re-open the app without entering the passcode.
The user can see a glimpse of the content underneath, once again providing a hook and incentivising the user to unlock the app to view the content.
The pin code which uses a code set by the user does allow them to enter any number of codes to attempt to unlock the app, there is no restriction on the number of codes they can enter.
There is also the option to unlock the app using the recovery methods or wait two hours until the app can be used again.
TikTok Digital Wellbeing Effectiveness
Although a step in the right direction and following feedback from Internet Matters, they have still provided hooks and little incentive to leave the app.
Some of TikTok’s most addicted users will see the digital well-being features as an annoyance to circumnavigate and the app provides an easy way to bypass the digital well-being features.
Some of the app features also tease content and offer entertainment rather than invite users to leave the app.
“Nudging” 13 to 17-year-olds about their usage if they reach over 100 minutes a day in the app is also a high bar, over 1 hour 30 minutes a day is already an extended period.
Screen time management can be more effectively controlled at the device level. You can activate it by opening your settings app.
Channel 4’s “The Undeclared War” is a TV Show about a third-party country undermining UK democracy by disrupting UK networks through cyber-attacks. The protagonist is an intern who has a front-row seat to the ordeal and the show is set inside GCHQ, at least that is what I have seen from the first two episodes. I’ll write up more when they are released.
Here is a breakdown of all of the techniques used in the show. It is clear the writers took at least some inspiration from actual real-world scenarios but then bent the rules or changed some aspects to fit the narrative of the episode, which makes the episode a little hard to watch.
The Undeclared War is an inside look at an attack on British internet infrastructure and the inner workings of GCHQ.
The Undeclared War Episode 1
The episode starts out in a fairground, analogous to hacking, as becomes clear when shots of Saara (main character) are interspersed with her sitting in a classroom playing against other hackers.
This is a reference to a game in hacker culture called a CTF or Capture the Flag. A Capture the Flag (CTF) is a popular way of introducing or testing a hacker’s ability, so in that sense at least the show got it right! CTFs are usually a social event and often very competitive, a good start to the first episode.
There are also some more references for the keen viewer, at one point Saara pulls out a hammer and starts knocking on bricks on a wall, this is similar to port knocking, a technique of security through obscurity whereby a system will not open a port to allow access to an application without first having a client send packets to a network connected device in a specific sequence across various port numbers.
After Saara is done knocking the bricks with a hammer, she is able to remove a brick (or the system opens a port) to view the valuable information inside.
It’s not clear how Saara would know the pattern in order to hit the bricks but is possibly something that she would have to capture using packet sniffing or know by other means, such as accessing the computer she is targeting using command line tools such as SSH or even remote desktop.
Screenshot of the hacking in “The Undeclared War” at 1:49
The show then cuts back to the real world out of the analogy briefly to show the commands Saara is running on her screen, we can see a lot going on but we see references to meterpreter.exe at the top.
Meterpreter is a penetration tool used to exploit programs in order to allow a hacker access to a system remotely, which we can see she has used it to dump the password hashes, but in this version of the tool meterpreter has been able to also decrypt the hashes and displays them on screen before she’s cracked them.
Despite this, she then runs a python3 program (python being a popular programming language) to run a program called hashcrack.py which takes a passwords.txt file as input probably to crack the hashes, to nitpick it looks like they’ve already been cracked, but perhaps she didn’t have all of the hashes yet.
Python also isn’t a particularly fast language for cracking passwords, a more direct access to the hardware is usually preferred so that the hashes can be computed quicker. Cracking hashes could take days to decades if the password is complex, so every minute advantage in performance counts.
Saara then at the end of the cutscene she runs the command -sT -vvv -n 192.158.1.254 which seems to be a bit of fat-fingering by Saara, because it’s supposed to be part of the line above or nmap, but the computer doesn’t seem to mind and dutifully executes the command as though nothing is wrong.
The whole time she seems to be switching between Linux and Windows commands arbitrarily and the computer doesn’t seem to mind, she never switches context from windows or Linux, the commands she entered don’t really make any sense throughout the episode in terms of what is actually possible on one operating system.
We can also see a CVE at the top of the screen, CVE’s are critical vulnerability notices used in various ways to identify and classify exploits in computer programs, it doesn’t really make sense that this would be labelled a “private exploit”, because it’s public by design.
The hacking then breaks into a printout of nmap
She then also tried to take a copy of the windows box using volume shadow copy, a tool for taking a form of backup, she then decides its time to scan for some open ports, it looks like the command -sT -vvv -n 192.158.1.254 is actually nmap, a port scanning tool, not that she actually runs nmap, it just outputs text extremely similar to it.
We can see that nmap lists the following open ports 445, 139, 53, 443, 80, 6969. 445 and 443 could possibly be SMB or file shares, or a webserver as we can see port 80 is also open, port 53 is for DNS so this box is perhaps also a DNS server, and port 6969 is I’m sure also a real thing, although my skills are lacking a bit when it comes to what this port is for, I don’t think its a real thing but actually a joke for the informed (or otherwise) viewer.
Saara spends the rest of the scene walking around with a tool belt on, clearly focused on the task at hand.
Then she is seen using various commands in the terminal, which are mostly nonsense, but it doesn’t complain at all. Clearly, the directors have turned off the output of the command line if the user types out an erroneous command.
Another screenshot of the terminal in The Undeclared War
At one point a timer pops up, we can see she runs the command msfvenom which prints out some hex. Cool, but even some of the best hackers in the world don’t spend their time reading hex, its like reading a barcode or serial number, it may make sense to computers, but without some real context and understanding of what is going on, its useless to humans.
Working at GCHQ
In the next hackery-type scenes we see, Saara has learned of the attack and starts looking at the code in a program called IDA at about 16 minutes in.
IDA Freeware from the TV show The Undeclared War
She spends some time scrolling around the code and at one point finds a lot of “garbage” a good way of showing that often tasks like this are tedious and hard to follow. When a compiler compiles a program it strips it of any human-readable comments or friendly function names that are easy to follow, so its often a lot of scrolling, annotating and scrolling to determine what the program does.
This part is a little bit confusing because she is able to identify “garbage” but isn’t able to tell that the code has been obfuscated, obfuscation is a way to make code harder to reverse engineer by having the program perform its function with extra complexity. Saara’s overseer calls the program “some FinFisher thing”, which isn’t really a method for obfuscation but whatever, perhaps I am misinterpreting what he is saying.
Interestingly the malware is also called Suspected_Malware.exe in IDA but later called SUSPECTED-MALWARE.exe in the sandbox.
The IDA freeware program allows you to read the program as machine code, somehow Saara doesn’t notice that the program is written to never run the functions or “garbage” she is looking at, despite the fact IDA would have clearly annotated this.
The software reverser Phill says that the garbage is to “confuse the look of the code so the antivirus software won’t recognise it as malware” which sort of makes sense, what he means is that it will change the signature of the program so the antivirus would not be able to detect the program as a known signature or the program behaviours are different than what the antivirus is designed to detect. Again, something Saara would probably know.
She is offered the opportunity to use their test environment, where she incorrectly corrects him about calling it a sandbox.
When she actually runs the program in the sandbox, it errors out and says it can’t run, which the reversing engineer (Phill) says to try to emulate actual user behaviour to see if you can trick it into running, but this is bad advice because they can just reverse the program to determine what is stopping the program from running!
Again, something Saara should understand and already know. “Paste in some word documents, scroll around a bit” lol, once again they have IDA so would be able to determine exactly what is required to cause this behaviour,
Imagine you are reading a book, but you don’t have time to read all of it, and you really just want to know why the main character’s favourite colour is red, you know that on page 20 they say their favourite colour is red, if we try to shoe-horn IDA into this analogy, we would get a direct reference to where the character grew up with a red front door, and that is why their favourite colour is red.
Programs need references in the code to establish behaviours, so when it throws up an error, they can just look through the code, find the error in the code, and trace it back to determine what caused the program to realise it was in a sandbox and prevent it from running, this is basic usage for IDA, its what it is designed to do.
Trying to “Paste in some word documents, scroll around a bit” is like trying to mow a lawn with scissors when you have a lawnmower, ineffective and poor use of the tooling they have.
Its also very unlikely an intern would be vetted enough to have this level of access.
Fear of Attribution
At one point, Danny (Simon Pegg) is reluctant to assign attribution of the malware, this is generally a good call, because it is a technique that advanced persistent threats would use, to implant false clues to assign attribution to a different adversary to throw off investigators. The show talks about Russian bots as well, a real-world issue.
Danny also is chastised for running stressing infrastructure against the network, running this type of test against a production environment during peak hours is a terrible idea.
The hack is also able to take down some parts of the web but leaves others up, this is odd, it may be technically possible however practically all of these systems will themselves have both redundancy and disaster recovery to bring the systems back online, especially products with SLA agreements with their customers.
Many of these systems would be hosted in clouds like AWS or Azure and generally have mechanisms built-in to prevent a global outage based on a single point of failure like a country going down, if a BGP route went down, for example it would not take too long before everything would be re-established through a new route.
Reversing Libraries
At around 28 minutes in, Phill laughs as Saara has reverse-engineered a library saying that “we’ve all done it”, but practically it is almost certainly a good idea, you can probably determine that a program is using a library and probably even check it against a known hash of the library.
The department missing this crucial part of the code by not looking is negligent and certainly something they would have done. They are looking for exactly what she has found, they aren’t looking for something else, so it is odd that they would discount her abilities, its a team effort.
The program opens a URL shortner link https://url.short/41e which isn’t a valid top level domain name, to run some code, which could run anything.