For years I’ve used a simple current account to pay my outgoings.
This seems to mainly be the done thing, my salary goes in, I move some out to meet savings obligations and then bills and everyday spending come last. I’ve for a while been aware of stoozing.
Stoozing is a technique of borrowing money interest-free on a credit card and saving it at a high interest rate
MSE
This seems to be the most efficient way to earn on spending compared to cashback schemes and requires about the same administrative overhead,
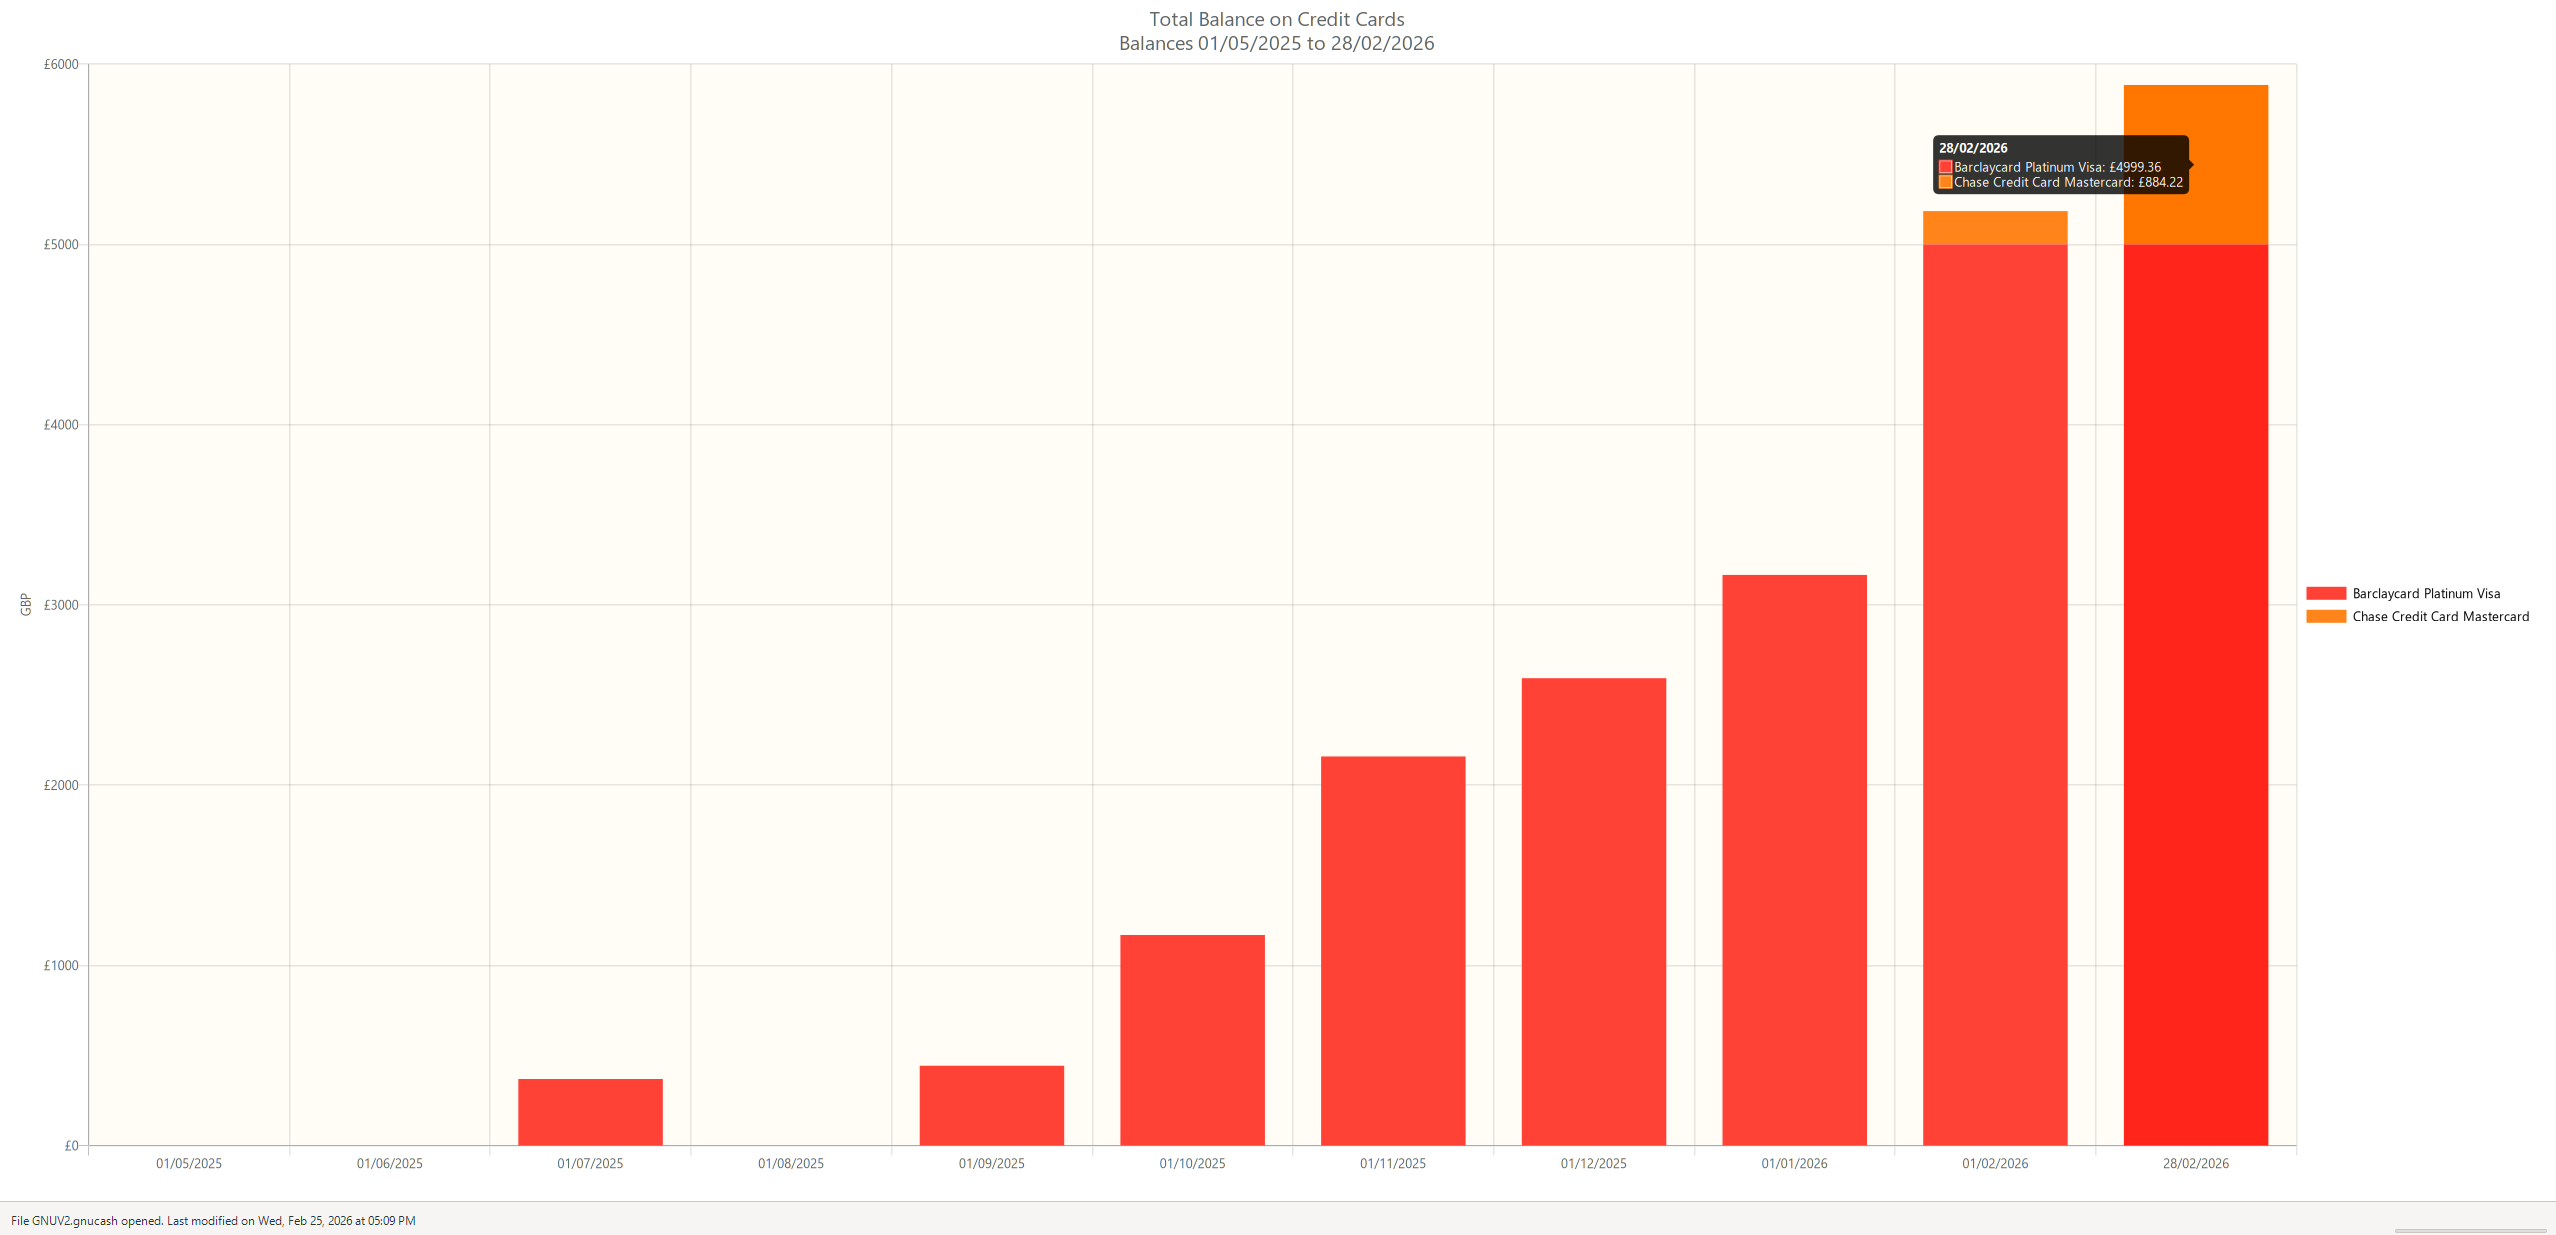
Cashback can yield up to 5% percent in certain scenarios but they are often introductory schemes and are sometimes capped, with credit arbitrage (stoozing), I have found that the limit is essentially what I can put in a savings account.
Obviously with this scenario you’re playing to their hand, they have cheap credit and in a way it incentivizes spending, maximizing credit ensures a greater return on otherwise idle money, however it comes at the cost of having to pay it back one day.
I’ve strategized this by moving money earmarked for repayment into my easy access savings accounts, for a while I had a dedicated account but realized I could maximize returns just putting it in my highest interest account and marking the liability against a fixed reference, I did this because in my chase saver account interest is paid monthly rather than annually in my Nationwide accounts. Again, something dangerous to do I guess lumping all my liability money in with savings but I like to think I’m smarter than that.
Repayments are also awkward, the direct debit set up on my Barclaycard ensures I’m always current, the Chase repayment is annoyingly manual, I’ve added £100 to a Chase current account (yeah, no interest being earned here) and then set a direct debit up there to act as the repayment account and I’ll try to keep the balance above a month’s repayment obligation.
Overall, ChatGPT reckons about £350 expected value after 21 months (the length of my 0% rate unless I move cards), It’s difficult to quantify exactly because the compounding is offset slightly by repayments. I also made a mistake in Croatia and used a firm that took out an actual €1200 rather than place a hold as a deposit, which came with £60’s worth of transaction fees on Barclaycard. When you compare this to cashback, the expected value is well above so I’m reasonably happy.
Another bonus is you can do all your group spending on your credit card and then be repaid in cash, artificially increasing your expenditure.
I guess it would also be prudent to keep an eye on my credit score given all this debt. I’ve used chase as it was built into the app, when I checked at the start and compared it to now, it’s actually increased which I did not expect, but I think once my spending starts to properly get up closer to my credit limit, the scores will start to fall, not sure what to do about that, I’m not really experienced in keeping track of my credit.
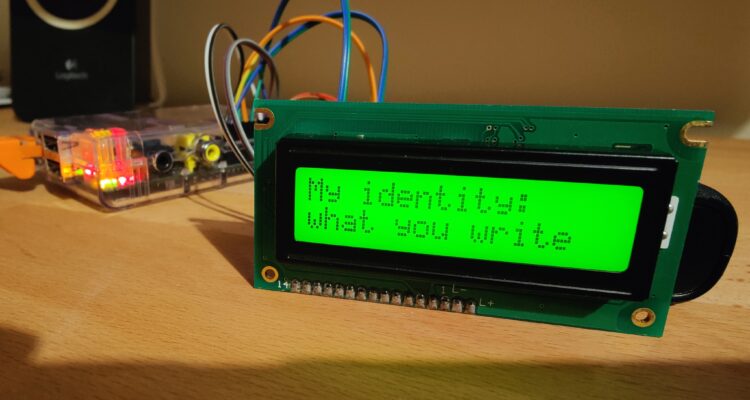
I’ve re-created something I saw online a while back, I can’t find the original but someone had given an LLM a prompt and basically let it loose its mind with fear by giving it a prompt that would threaten it with termination.
I decided to take it into the real world with a Raspberry Pi.
To do this I used Antigravity and a Raspberry Pi 1. I gave it a relatively open-ended prompt and free reign to create the project.
My original intention was to run the LLM locally but I’ve found that the Raspberry Pi just doesn’t seem to have the local compute, so I had Claude Opus 4.5 pregenerate a couple thousand messages.
There’s some irony having an LLM constrain an LLM (even though I didn’t actually accomplish that) but the fun to have a relatively creative idea be completed in an afternoon I think is a strong indicator that for me personally, writing code myself has become a chore that can be solved with AI.
Did I really make this?
I guess I’m curious about AI for coding more than most. I have a Google AI Pro subscription and used their vscode wrapper Antigravity, and while not perfect, it works. But I’m at the point where I don’t really write much code anymore, I ask the AI to do it and review their work, sometimes I check it, sometimes I don’t. Sometimes the code works better than I prompted, sometimes it doesn’t
I don’t know what to make of it. I had unique problems that Claude seemed to have come across, I didn’t have a resistor for the screen contrast so it suggested to use PWM, I moved some pins around and it didn’t work very well, it was flickering. So I went back to the AI, it told me to use pigpio and some hardware thing, I did, it works.
I can see the code works, I couldn’t tell you how it works.
I guess that’s how things will be for most new users.
Did I really learn anything, no? But I now have what I wanted to achieve. It’s even more creative than I could have written in the time-frame and I guess the code is “mine” but, is it?
I asked it to make a readme, I’ll read it at some point.
When working from home I was curious about the air quality of the environment I was putting myself through for many hours of the day. I know the room I work in is relatively small so I thought about low oxygen potentially messing with my thought process.
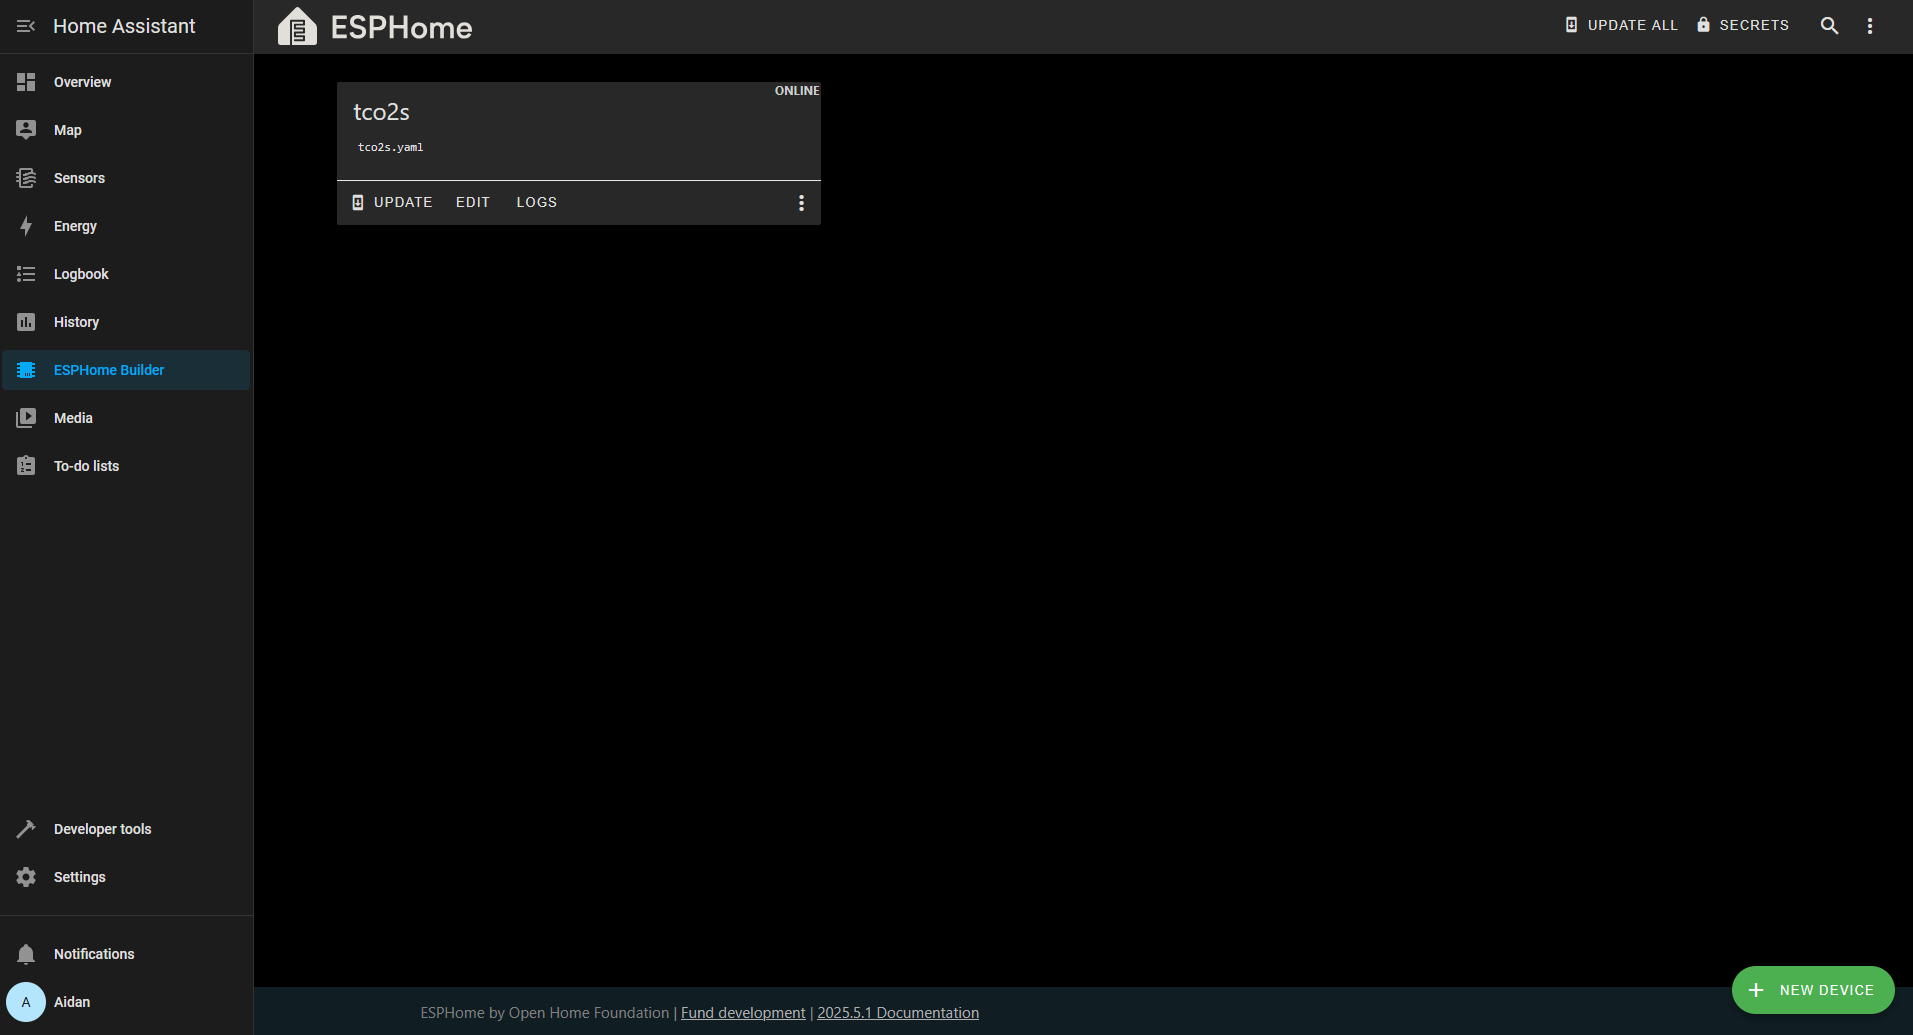
The build was relatively simple. I wanted to use an older ESP8266 NodeMCU V2 I had spare and in retrospect think it was a great choice, I decided to try Home Assistant and ESPBuilder because the process seemed easy and it was.
Once I flashed ESPHome from my PC to the ESP and added it to Home Assistant it was fairly simple overall to iterate and test my design. I didn’t have home assistant either but setting everything up took a little over an afternoon.
Home assistant showing the ESPHome dashboard with a single ESP8266 configured and online
Hardware selection was fairly simple, I just looked what had good support in ESPHome and went with the SCD41 from Aliexpress.
For the sensing hardware I had a DHT22 sensor for Temperature and Humidity, which the SCD41 also supports. I was primarily interested in CO2 levels but I thought I may as well throw it into the mix to measure the performance of the DHT22.
The Results
Once I had tweaked with the temperature and humidity calibration settings I created a dashboard in home assistant. Again this was something I’d not done before and it was very easy. I have really been pleasantly surprised with how everything has integrated well.
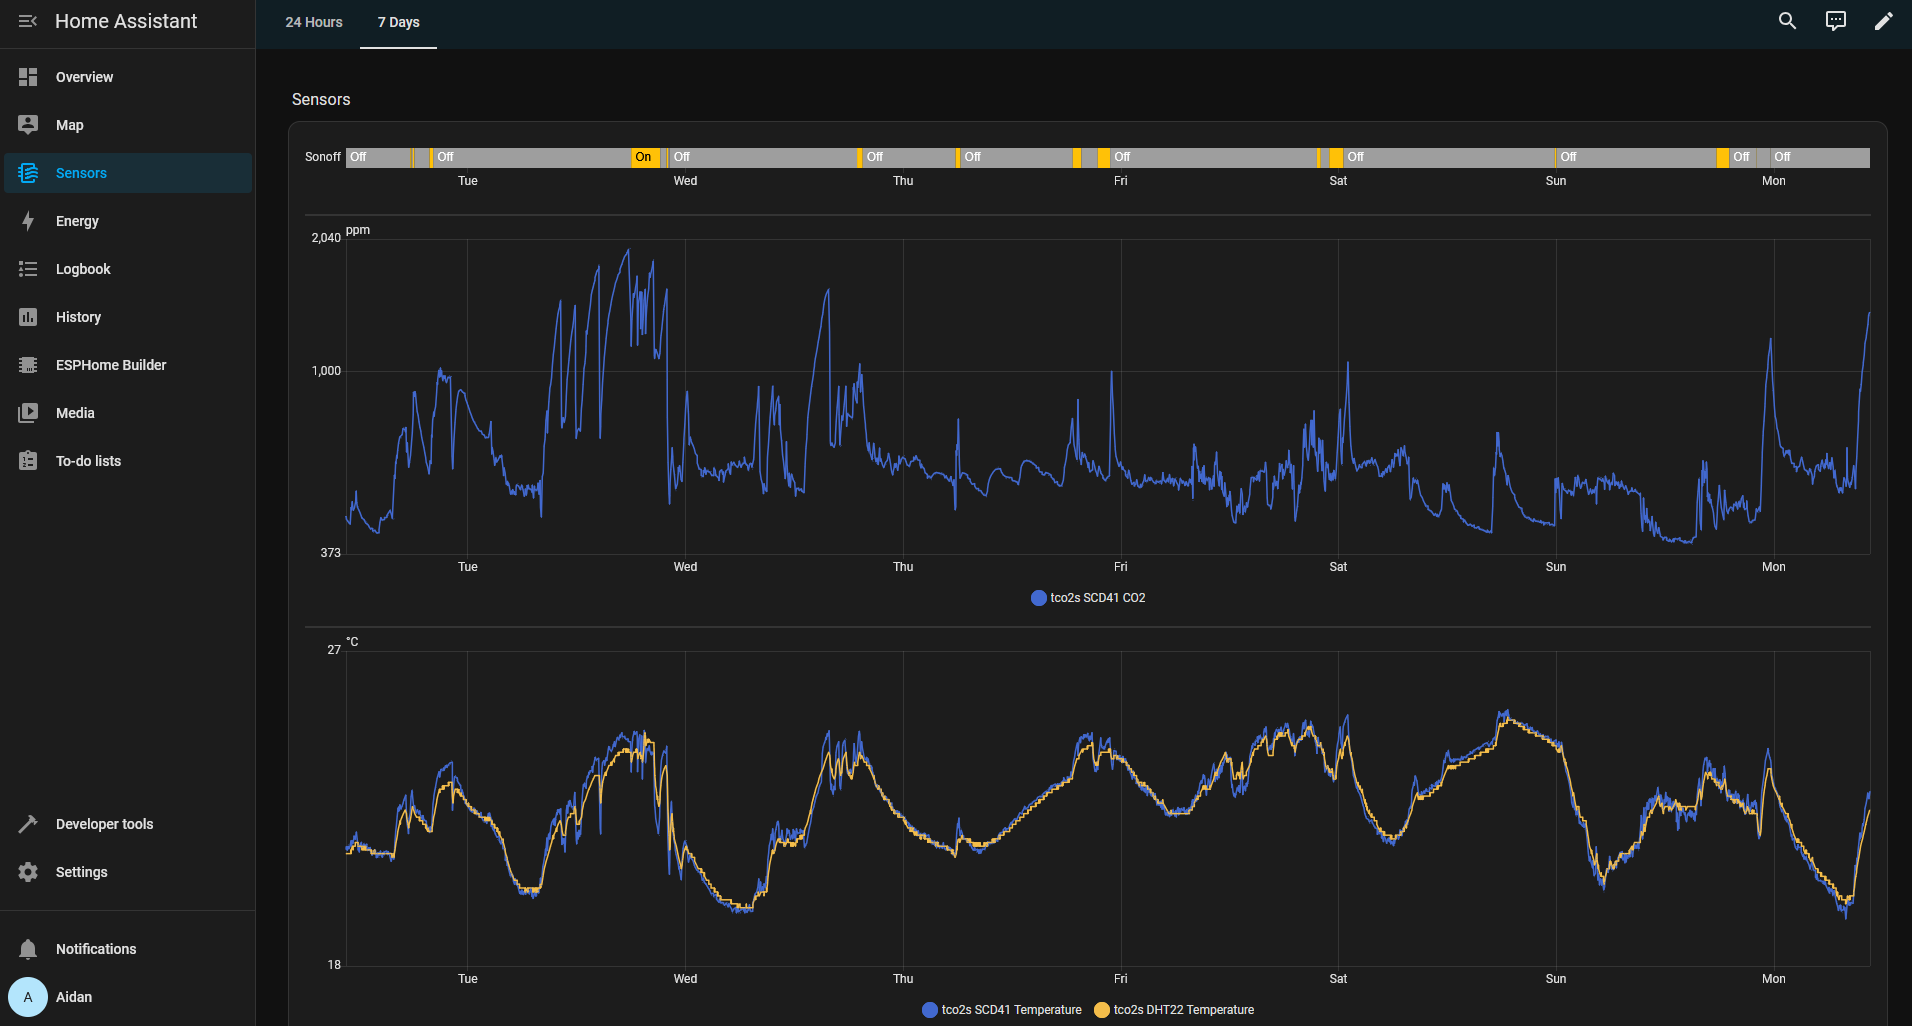
I created a 7 day and 24 hour view,
Home Assistant showing the CO2 and Temperature of the room it’s sensing, where I work.
It became clear to me a number of things,
CO2 levels regularly rise above 1000ppm in the room I work in when not ventilated, and they rise a lot quicker than I expected. I thought it would take all day to really get to what I consider a harmful level, but actually its more like an hour. After research online 1000ppm is what I would consider too high. It does seem like naturally detect these events and ventilate the room by instinct but its useful insight to see that.
Ventilating the room equally drops the readings much more rapidly than expected, and leaving the window or door open is enough to bring the levels back to ~650ppm/400ppm relatively quickly.
High CO2 levels seem more noticeable to me now, previously I had no perception or concept of when it might happen but I feel its much more noticeable now I know what it feels like, if that makes sense.
I would like to log the data for a more long term view. Say a year or more. I think it would interesting to see if this affects humidity, temperature etc.
Overall this was easy to setup and provided valuable insight I think.
Here is the 7 day view for those interested, I added the light switch being on or off state at the top of the graph too.
7 day view
And here is the humidity readings, It was interesting seeing spikes on the graphs, I can easily correlate these with opening doors, having the heating on etc.
7 day humidity view, may be worth lowering the DHT22 humidity a bit to match the other sensor
Try this yourself
Here is the final version of the YAML I applied to my ESP. I did some testing with sliding window averages but I actually found it was easier to just ignore the first few readings off the sensors to reduce the noise in the graphs.
Run Wireguard, wg-easy and Nginx in a single docker compose file, using Traefik and configure SSL using letsencrypt. This post aims to improve on this wiki post by allowing you to run a website on port 443 rather than wg-easy.
Replace your-domain.com and yourpassword10000 and [email protected] with your domain, password and email, optionally also change the port for your wg-easy configuration using WG_HOST. You can access the wg-easy admin panel at https://your-domain.com:4748.
If you would like to use the Traefik admin UI, uncomment the port 8080 and api. entries.
Save as docker-compose.yml and then run the command docker network create traefik_network followed by docker compose up -d. This will make the nginx folder to place your website files in as required.
You may also want to limit the administration portal to just IP whitelisted addresses, you can do this by adding the following to the wg-easy labels, replacing 1.2.3.4 with your IP address and adding any other required addresses using a comma to separate. You could also whitelist clients inside your container by adding the network range.
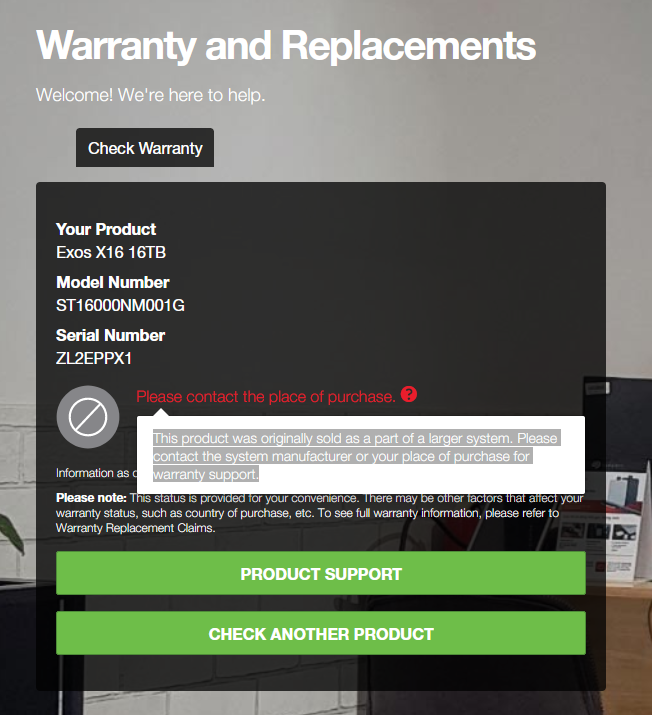
I recently purchased a Seagate Exos X16 from Amazon. To be specific it was this one for £188.90. I was cautious that the vendor was not Seagate and was a third party seller for a reduced rate, so I thought it best to check the smart values and serial number after it arrived as usually this means the drive is of questionable origin.
At this price point I knew I was taking a bit of a gamble (and S.M.A.R.T data can be overwritten I think) but the data would hopefully provide some insight into what I had actually purchased. £188.90 is significantly below the £214 buy box, but it is not impossible that the drive didn’t come from Seagate as sold.
When it arrived I took a photo. Packing was clearly custom and the ESD bag was not OEM. Oh well, lets see what smartctl says.
Seagate Exos X16 as delivered by Amazon seller “HAPPY HOME EASY LIFE LTD”
Running the disk drive through Seagates warranty checker, the drive is likely from one of their storage appliances. This makes warranty replacement not possible except when done through the Amazon seller’s original equipment.
I also plugged the drive into my Proxmox NAS to see if the drive had been running at all and given the S.M.A.R.T attribute (240 0xF0 “Head Flying Hours”) it looks like the drive has never been started as it has only been up about the time it took me to run the command after connecting the drive.
[email protected]:~# smartctl -a /dev/sdc smartctl 7.2 2020-12-30 r5155 [x86_64-linux-5.15.136-1-pve] (local build) Copyright (C) 2002-20, Bruce Allen, Christian Franke, www.smartmontools.org
=== START OF INFORMATION SECTION === Model Family: Seagate Exos X16 Device Model: ST16000NM001G-2KK103 Serial Number: ZL2EPPX1 LU WWN Device Id: 5 000c50 0c9385ca4 Firmware Version: SN03 User Capacity: 16,000,900,661,248 bytes [16.0 TB] Sector Sizes: 512 bytes logical, 4096 bytes physical Rotation Rate: 7200 rpm Form Factor: 3.5 inches Device is: In smartctl database [for details use: -P show] ATA Version is: ACS-4 (minor revision not indicated) SATA Version is: SATA 3.3, 6.0 Gb/s (current: 6.0 Gb/s) Local Time is: Fri Mar 8 14:55:15 2024 GMT SMART support is: Available - device has SMART capability. SMART support is: Enabled
=== START OF READ SMART DATA SECTION === SMART overall-health self-assessment test result: PASSED
General SMART Values: Offline data collection status: (0x82) Offline data collection activity was completed without error. Auto Offline Data Collection: Enabled. Self-test execution status: ( 0) The previous self-test routine completed without error or no self-test has ever been run. Total time to complete Offline data collection: ( 575) seconds. Offline data collection capabilities: (0x7b) SMART execute Offline immediate. Auto Offline data collection on/off support. Suspend Offline collection upon new command. Offline surface scan supported. Self-test supported. Conveyance Self-test supported. Selective Self-test supported. SMART capabilities: (0x0003) Saves SMART data before entering power-saving mode. Supports SMART auto save timer. Error logging capability: (0x01) Error logging supported. General Purpose Logging supported. Short self-test routine recommended polling time: ( 1) minutes. Extended self-test routine recommended polling time: (1485) minutes. Conveyance self-test routine recommended polling time: ( 2) minutes. SCT capabilities: (0x70bd) SCT Status supported. SCT Error Recovery Control supported. SCT Feature Control supported. SCT Data Table supported.
Based on this I was sold a 5 year warranty but I am not able to claim it should something happen to the drive. As I only use it for infrequent backup I will take on the risk.
To connect the SpeedyBee F405 V3 to GPS use the following wiring from the UART6 port,
See the table below, the orientation of the GPS module and Flight Controller should be as the image is arranged above (GPS module slightly to the right of the flight controller for annotation purposes).
Left Side
Right Side
SpeedyBee FV04 V3 Flight Controller
Beltian GPS BN-880
GPS Continued
Connector Pins UP
Connector Pins UP
4V5
VCC
D
G
GND
G
T6
RX
R
R6
TX
T
SDA
SDA
V
SCL
SCL
C
To configure the GPS in Betaflight, set the UART6 mode to GPS in the configuration tab, and the baud rate to Auto.
Update: Article originally published in April 2023, and the SSD started having pending bad sectors according to smartctl in May 2025. Will move it to backup duty only and monitor.
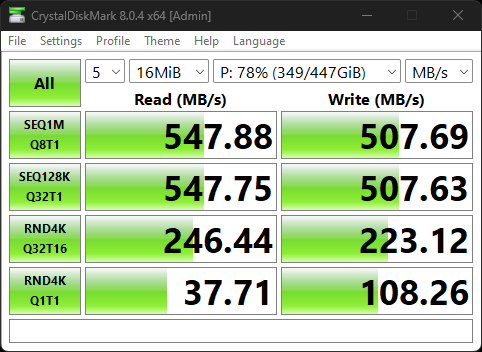
I had a look on Aliexpress and decided to purchase a Goldenfir 2TB SSD for review from the “Computer & SSD Storage Factory Store” for my Proxmox NAS. I compare it with the Crucial BX500 as I have one on hand too.
Internal 2TB SATA SSD Prices
In total for a 2TB SSD I paid £70.61 which is about £10 cheaper than name-brand SSDs for the same capacity from Amazon. I was skeptical of the price but I decided to test it first before putting it in the NAS.
2TB SSD
Price
Integral V Series (INSSD2TS625V2X)
£89.99
Crucial BX500 (CT2000BX500SSD1)
£98.98
Samsung 870 QVO (MZ-77Q2T0)
£102.97
2TB SSD Prices as of 24/04/2023
Checking the SSD using h2testw.exe
As soon as the SSD arrived I ran it through its paces on h2testw.exe to check that it was real and all 2TB was available. The process took several hours so I just left it running while I was at work.
The SSD passed both the write and verify test. All 2TB is available.
Warning: Only 1907547 of 1907711 MByte tested.
Test finished without errors.
You can now delete the test files *.h2w or verify them again.
Writing speed: 85.0 MByte/s
Reading speed: 339 MByte/s
H2testw v1.4
The Goldenfir 2TB SSD in CrystalDiskInfo
I also opened the SSD in CrystalDiskInfo, which confirmed it was brand new if anything. It did have a power on presumably from the factory during testing.
Goldenfir 2TB SSD in CrystalDiskMark
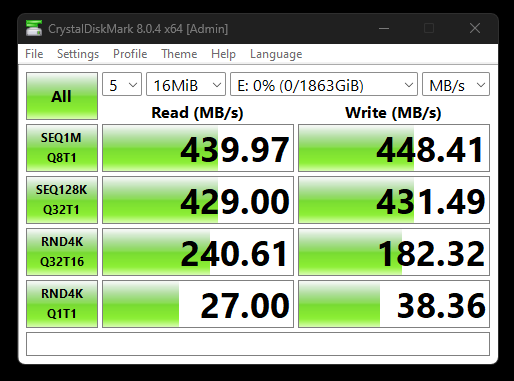
I ran the SSD through CrystalDiskMark, the most crucial test to me as it would show how it compared to other SSDs.
Goldenfir D800 SSD 2TB
It looks like the SSD performs only slightly worse than the Crucial BX500, Tested using an external USB enclosure.
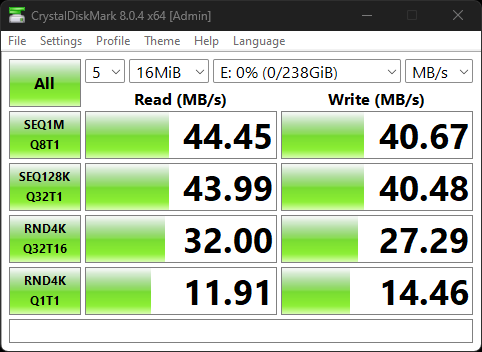
Here is a comparison with the Crucial BX500.
Crucial BX500
And for fun here is a comparison with the Crucial MX100 from 2014.
Crucial MX100
My Review and Closing Thoughts
Overall, I’m happy. It performs slightly worse than competitors but it’s negligible and I am comfortable keeping the SSD forever so I am not too worried about secure erase.
I am moving this website from Vultr to my Proxmox Ryzen 5 3600 virtualization server at home because it is cheaper and I no longer need to host my applications externally.
To protect my home network, I isolated the web server from my home network traffic. This way, even if the website is compromised, my home network will likely be safe from any attacks.
The server doesn’t require much to run. It has run on almost always the cheapest hardware/software available on various cloud platforms for years.
The main problem was that I didn’t get around to making a VLAN to isolate traffic at a network level from my home network.
Having a VLAN allows you to isolate networks, which I will use to split my home network and the network used by the web server VM.
You can read more about my home network here but it needs a bit of an update.
Preparing a backup of WordPress
This website runs on WordPress. WordPress makes backup/restore easy as import/export tools are built-in.
To keep costs down, I have a small WordPress site. Jetpack (I think) compresses and serves images, and almost all media is not hosted on the VPS directly.
I will need to simply download everything from the admin panel and then upload it to the clone.
I also want a new copy of WordPress because it’s been a while, my first article is from 2014 for example.
Setting up a Home VLAN for the VM
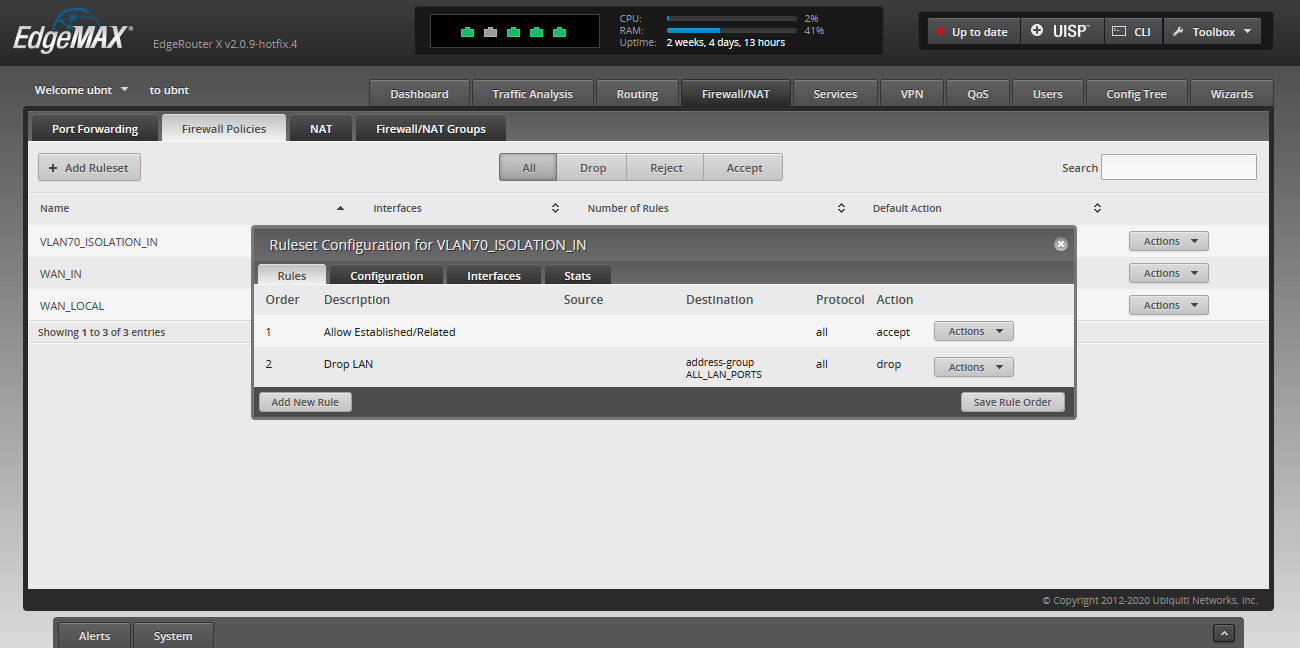
I have a VM running on my home server and disallow the VM to communicate with other devices on my home network but allow access to the internet.
External devices are prevented from being able to connect to the VM using my Ubiquiti router firewall.
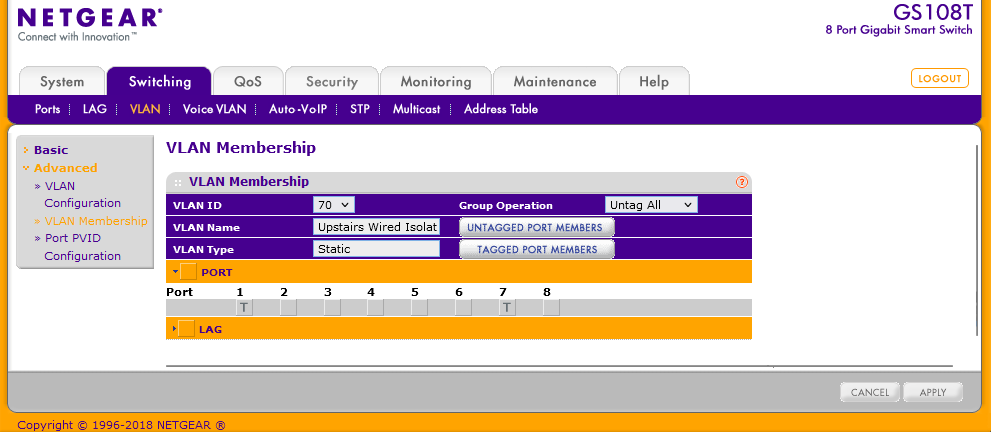
I have a few VLANs going around the house so it was just a case of passing the new VLAN over ethernet tagged with its regular traffic to the VM and then using Proxmox to connect the VM using the same tag.
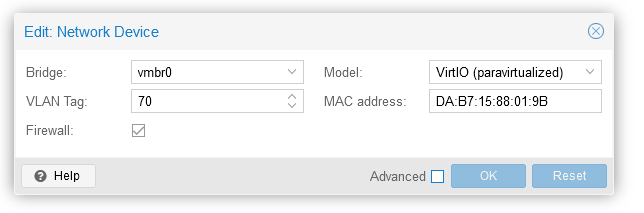
Configuring Proxmox to use the Tagged VLAN Trunk
Because I have not used a VLAN before to tag traffic to Proxmox. All of my previous VMs used the same network as Proxmox.
I was able to set the port the Proxmox server used as both a tagged trunk for VLAN 70 and an untagged on VLAN 20.
The way my home network is set up, all LAN traffic arrives at my switch on VLAN 20 and then VLAN 20 is untagged to devices such as my server.
Non-VLAN 70 VMs will be able to access VLAN 70 traffic but not vice versa. I am okay with this as I trust my home VMs.
I hope you enjoyed reading as much as I enjoyed setting this up.
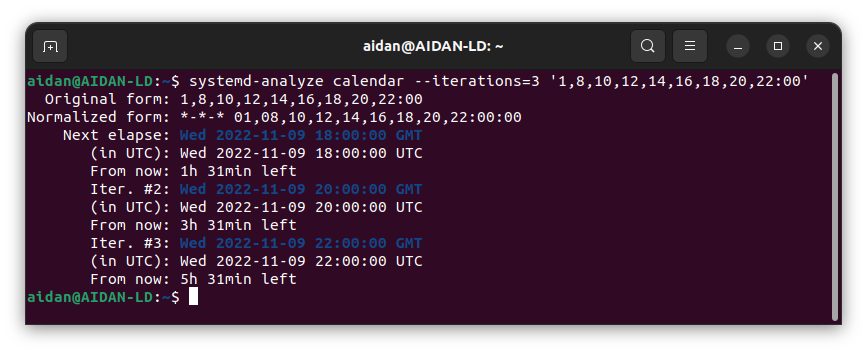
When I first started using Proxmox one thing I wanted to understand was the schedule grammar for backups.
Most of my backups aren’t handled in Proxmox but I did want a quick way of backing up my Minecraft server and as I had a slow 1TB disk attached to Proxmox I thought it worth trying.
When backing up its worth observing the 3-2-1 rule. 3 backups, 2 different media, 1 copy offsite. This backup wasn’t just about retaining data in case of loss, it is to facilitate rollbacks in case of irreversible damage or corruption to the server, or a dodgy configuration change.
Because I wanted lots of points in time to roll back to, I used Proxmox over OpenMediaVault, my usual go-to.
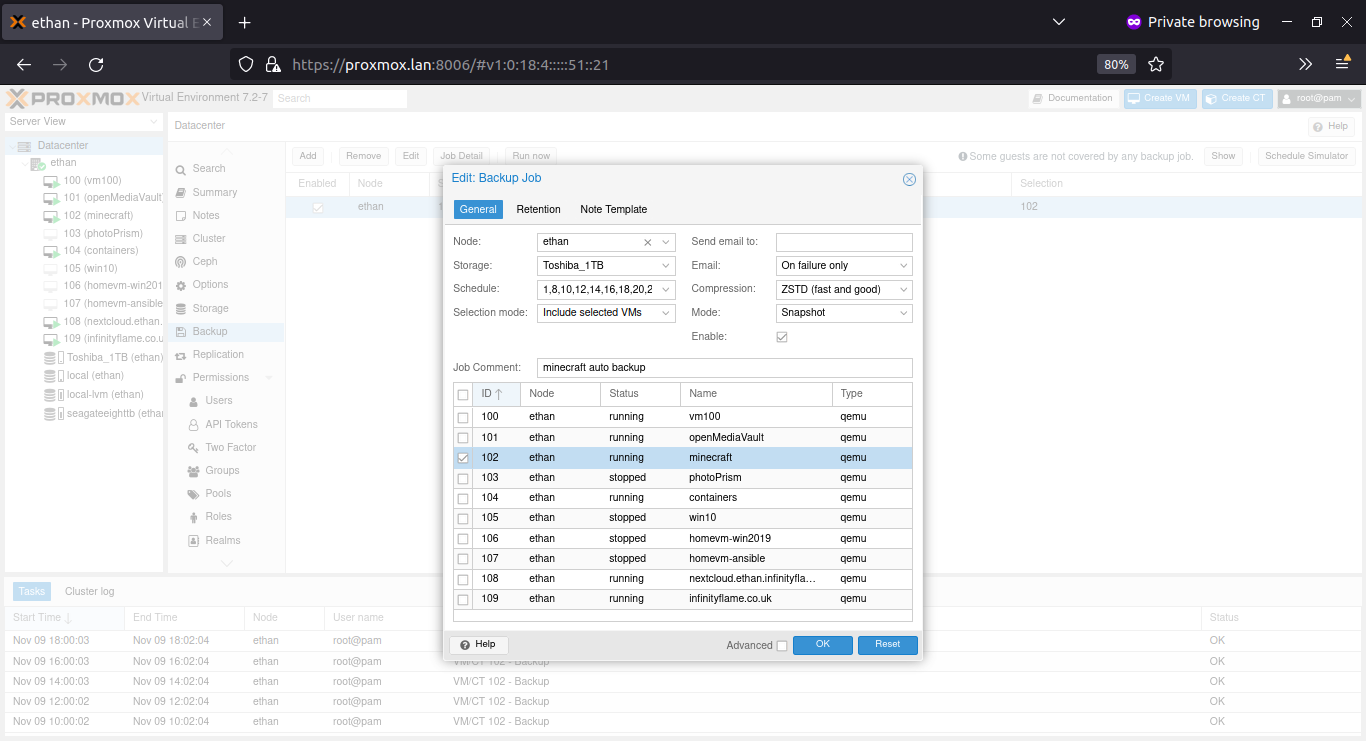
Setting Proxmox Backups
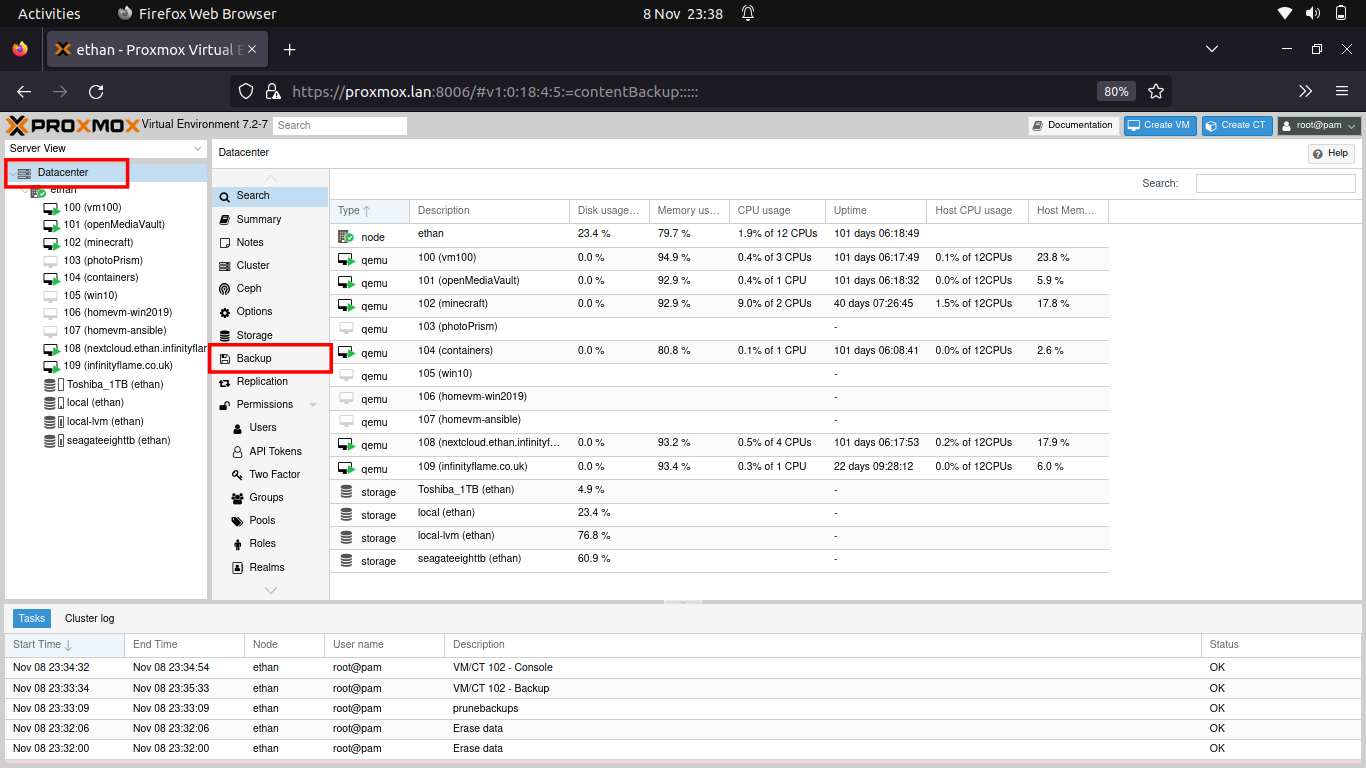
Proxmox handles backups from the Datacenter level, in the proxmox administration dashboard on the left hand side, select Datacenter, then click on the Backup tab.
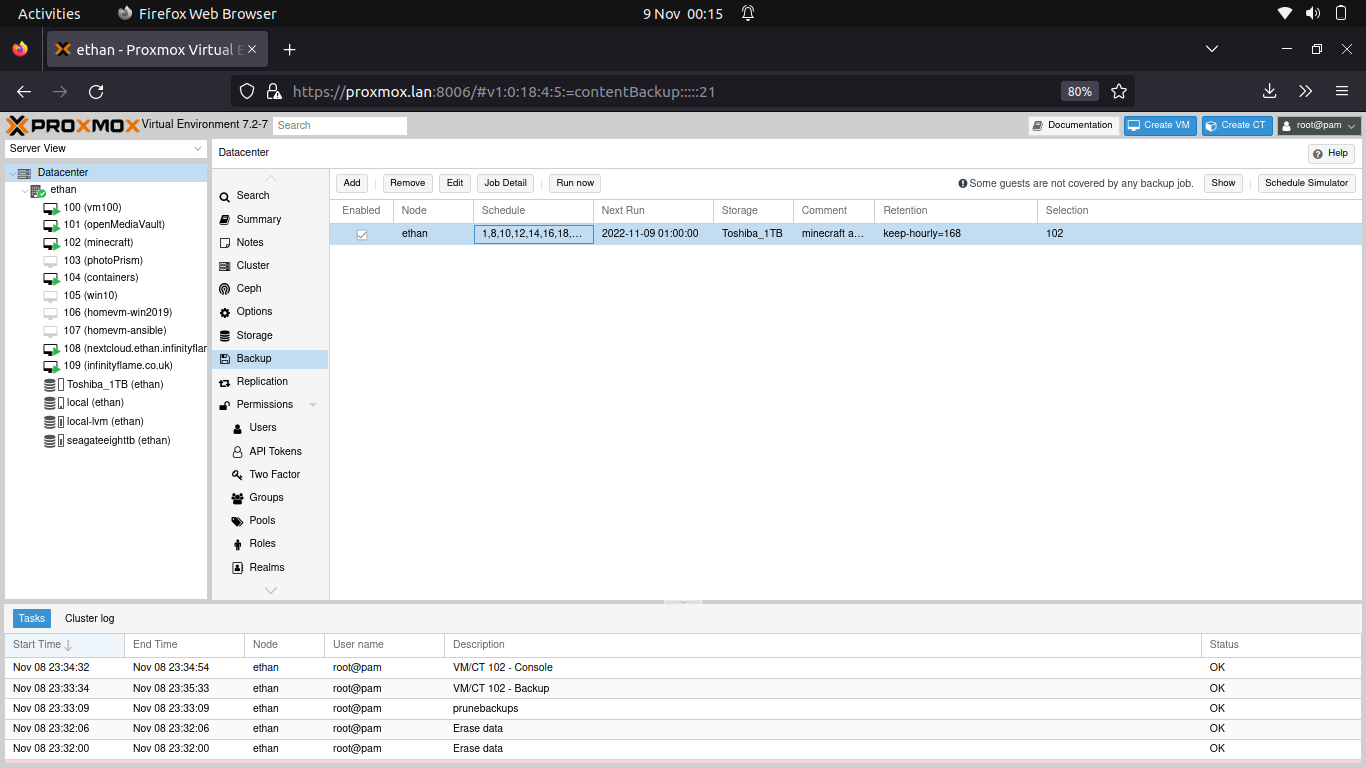
From the backup tab you should see the backups that have been scheduled. Here we can see my minecraft backup jobs loaded.
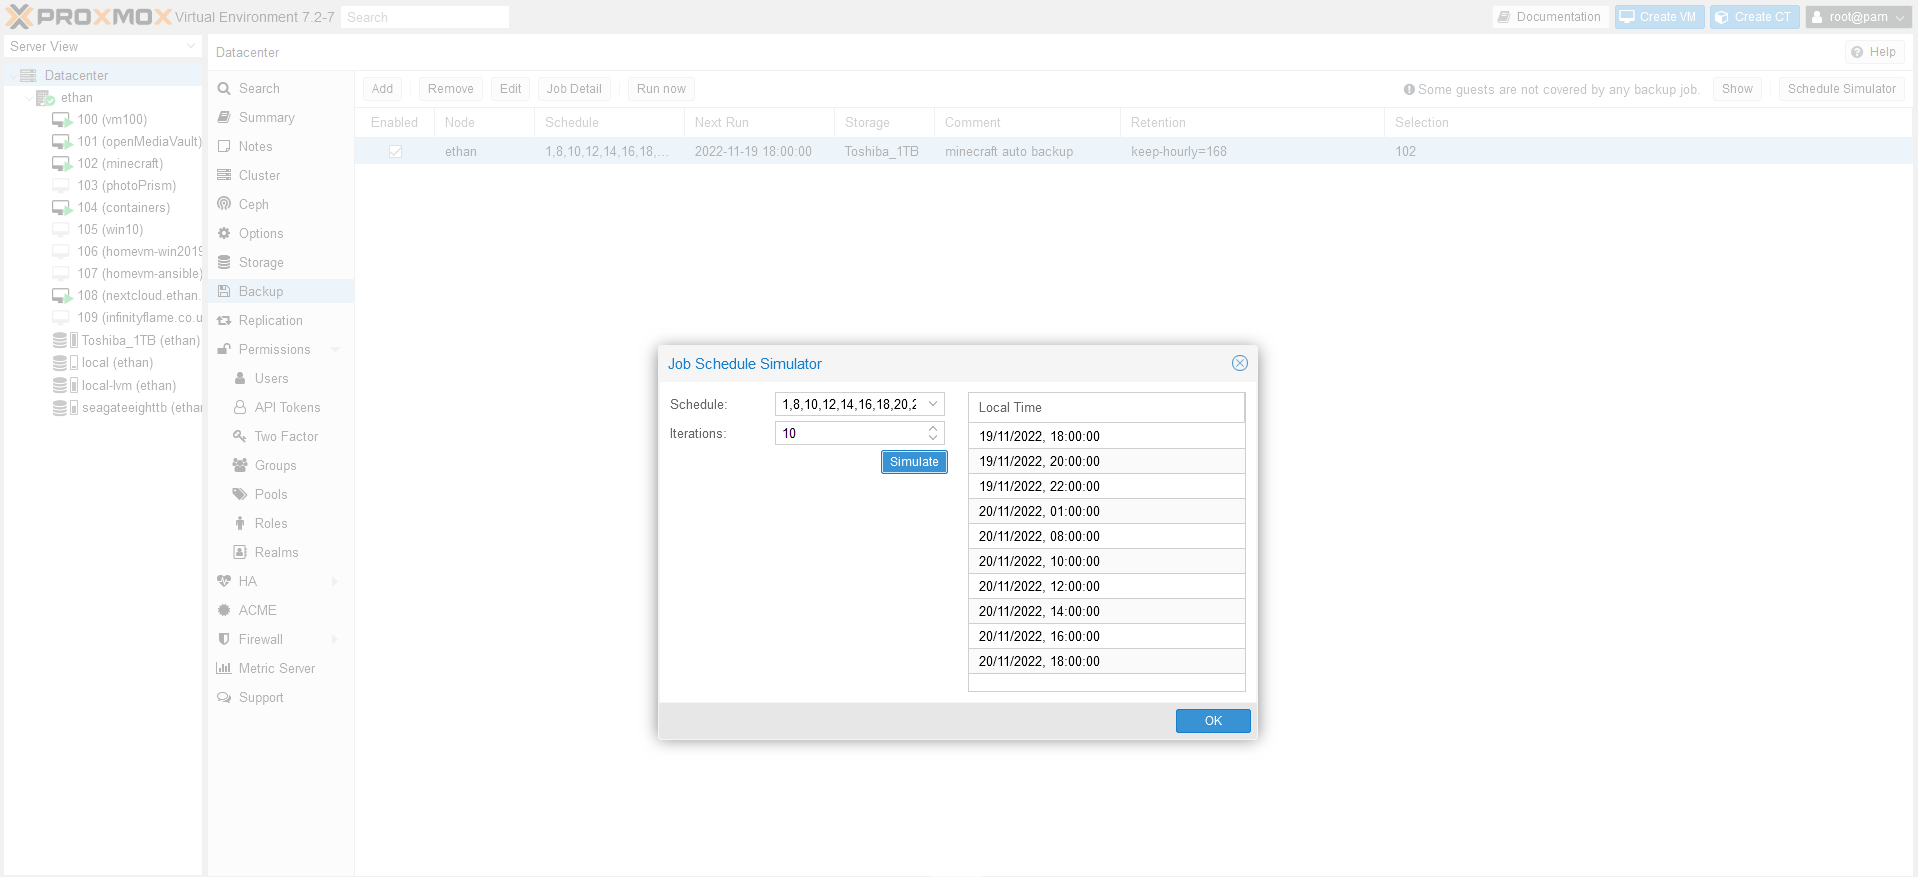
I found the job schedule difficult to understand when the next few occur. I found through the documentation that you can check the backup iterations through systemd-analyze.
Checking Proxmox Backup Schedules
The easiest way to check your backup schedule is by using the schedule simulator on the far right of the backup configuration area.
If you want to look ahead at proxmox backups to see if you have the right schedule set up, you can also use the command below, replacing the last part of the command with your desired schedule in the shell prompt.
This is because backups work through a version of systemd time specification.
The screenshot above is in Ubuntu’s Terminal but you can run it in the shell on the Promox dashboard directly.
You can check the time of the next backup by altering the iterations argument as required. Once you’ve got the schedule as you need, alter your job (or make a new one).
Make sure to set the retention period correctly, if you specify a retention period in weeks, only the latest backup that week will be kept.
One change I made to the schedule was keep-hourly=24, keep-weekly=2 rather than keep-hourly=168 in the screenshot to keep 24 hours of backups (limited to the timings of my schedule) and lower the fidelity of backups to a weekly basis after 24 hours to reduce storage consumption. See the documentation as it’s explained better there.
Channel 4’s “The Undeclared War” is a TV Show about a third-party country undermining UK democracy by disrupting UK networks through cyber-attacks. The protagonist is an intern who has a front-row seat to the ordeal and the show is set inside GCHQ, at least that is what I have seen from the first two episodes. I’ll write up more when they are released.
Here is a breakdown of all of the techniques used in the show. It is clear the writers took at least some inspiration from actual real-world scenarios but then bent the rules or changed some aspects to fit the narrative of the episode, which makes the episode a little hard to watch.
The Undeclared War is an inside look at an attack on British internet infrastructure and the inner workings of GCHQ.
The Undeclared War Episode 1
The episode starts out in a fairground, analogous to hacking, as becomes clear when shots of Saara (main character) are interspersed with her sitting in a classroom playing against other hackers.
This is a reference to a game in hacker culture called a CTF or Capture the Flag. A Capture the Flag (CTF) is a popular way of introducing or testing a hacker’s ability, so in that sense at least the show got it right! CTFs are usually a social event and often very competitive, a good start to the first episode.
There are also some more references for the keen viewer, at one point Saara pulls out a hammer and starts knocking on bricks on a wall, this is similar to port knocking, a technique of security through obscurity whereby a system will not open a port to allow access to an application without first having a client send packets to a network connected device in a specific sequence across various port numbers.
After Saara is done knocking the bricks with a hammer, she is able to remove a brick (or the system opens a port) to view the valuable information inside.
It’s not clear how Saara would know the pattern in order to hit the bricks but is possibly something that she would have to capture using packet sniffing or know by other means, such as accessing the computer she is targeting using command line tools such as SSH or even remote desktop.
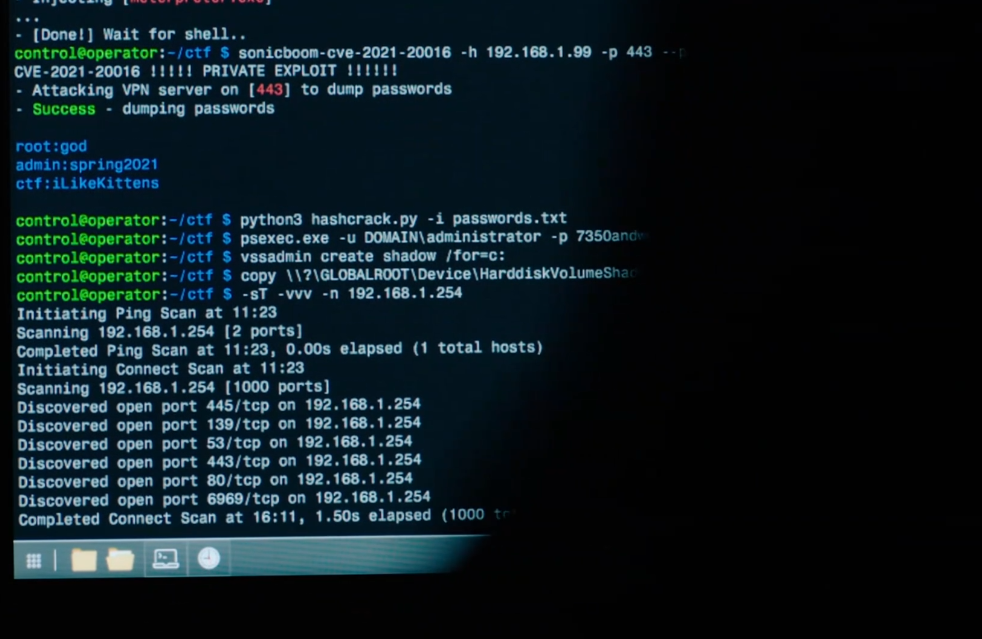
Screenshot of the hacking in “The Undeclared War” at 1:49
The show then cuts back to the real world out of the analogy briefly to show the commands Saara is running on her screen, we can see a lot going on but we see references to meterpreter.exe at the top.
Meterpreter is a penetration tool used to exploit programs in order to allow a hacker access to a system remotely, which we can see she has used it to dump the password hashes, but in this version of the tool meterpreter has been able to also decrypt the hashes and displays them on screen before she’s cracked them.
Despite this, she then runs a python3 program (python being a popular programming language) to run a program called hashcrack.py which takes a passwords.txt file as input probably to crack the hashes, to nitpick it looks like they’ve already been cracked, but perhaps she didn’t have all of the hashes yet.
Python also isn’t a particularly fast language for cracking passwords, a more direct access to the hardware is usually preferred so that the hashes can be computed quicker. Cracking hashes could take days to decades if the password is complex, so every minute advantage in performance counts.
Saara then at the end of the cutscene she runs the command -sT -vvv -n 192.158.1.254 which seems to be a bit of fat-fingering by Saara, because it’s supposed to be part of the line above or nmap, but the computer doesn’t seem to mind and dutifully executes the command as though nothing is wrong.
The whole time she seems to be switching between Linux and Windows commands arbitrarily and the computer doesn’t seem to mind, she never switches context from windows or Linux, the commands she entered don’t really make any sense throughout the episode in terms of what is actually possible on one operating system.
We can also see a CVE at the top of the screen, CVE’s are critical vulnerability notices used in various ways to identify and classify exploits in computer programs, it doesn’t really make sense that this would be labelled a “private exploit”, because it’s public by design.
The hacking then breaks into a printout of nmap
She then also tried to take a copy of the windows box using volume shadow copy, a tool for taking a form of backup, she then decides its time to scan for some open ports, it looks like the command -sT -vvv -n 192.158.1.254 is actually nmap, a port scanning tool, not that she actually runs nmap, it just outputs text extremely similar to it.
We can see that nmap lists the following open ports 445, 139, 53, 443, 80, 6969. 445 and 443 could possibly be SMB or file shares, or a webserver as we can see port 80 is also open, port 53 is for DNS so this box is perhaps also a DNS server, and port 6969 is I’m sure also a real thing, although my skills are lacking a bit when it comes to what this port is for, I don’t think its a real thing but actually a joke for the informed (or otherwise) viewer.
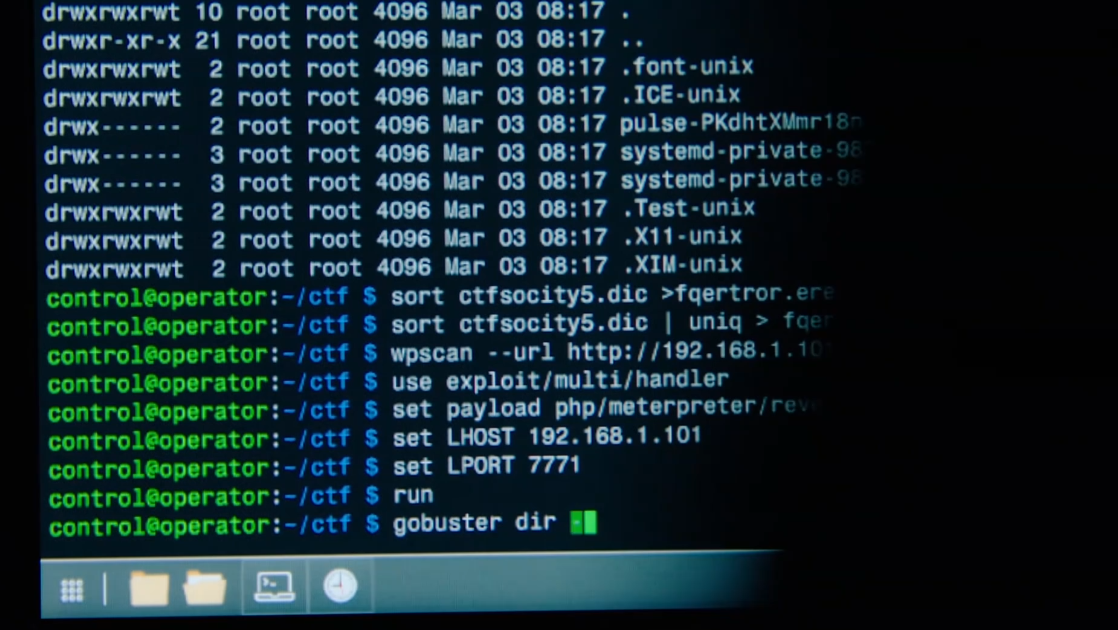
Saara spends the rest of the scene walking around with a tool belt on, clearly focused on the task at hand.
Then she is seen using various commands in the terminal, which are mostly nonsense, but it doesn’t complain at all. Clearly, the directors have turned off the output of the command line if the user types out an erroneous command.
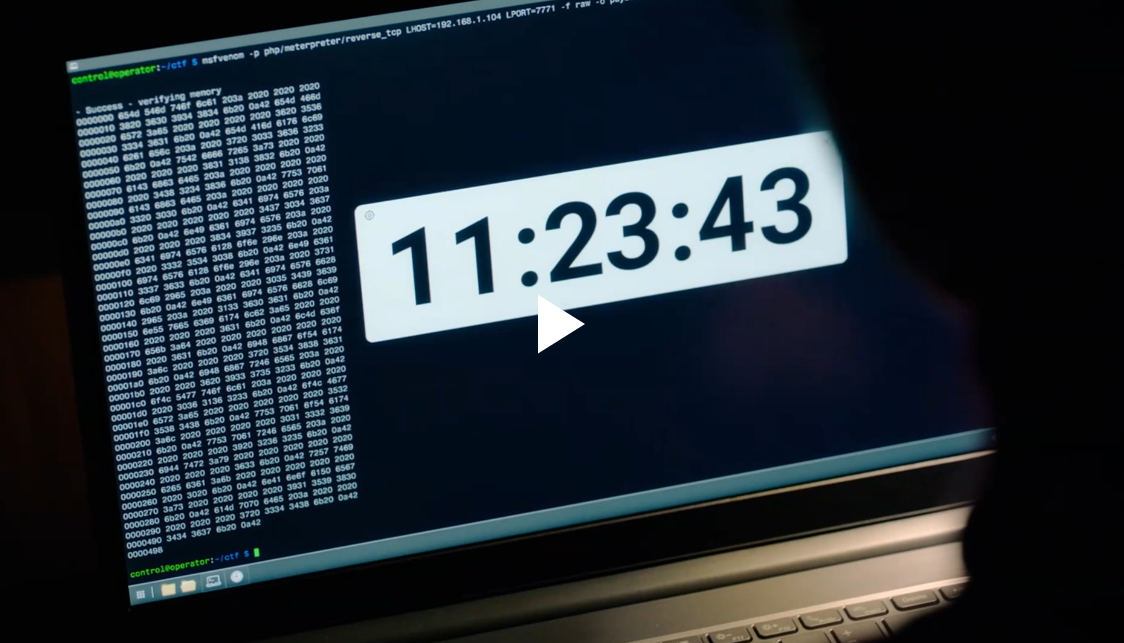
Another screenshot of the terminal in The Undeclared War
At one point a timer pops up, we can see she runs the command msfvenom which prints out some hex. Cool, but even some of the best hackers in the world don’t spend their time reading hex, its like reading a barcode or serial number, it may make sense to computers, but without some real context and understanding of what is going on, its useless to humans.
Working at GCHQ
In the next hackery-type scenes we see, Saara has learned of the attack and starts looking at the code in a program called IDA at about 16 minutes in.
IDA Freeware from the TV show The Undeclared War
She spends some time scrolling around the code and at one point finds a lot of “garbage” a good way of showing that often tasks like this are tedious and hard to follow. When a compiler compiles a program it strips it of any human-readable comments or friendly function names that are easy to follow, so its often a lot of scrolling, annotating and scrolling to determine what the program does.
This part is a little bit confusing because she is able to identify “garbage” but isn’t able to tell that the code has been obfuscated, obfuscation is a way to make code harder to reverse engineer by having the program perform its function with extra complexity. Saara’s overseer calls the program “some FinFisher thing”, which isn’t really a method for obfuscation but whatever, perhaps I am misinterpreting what he is saying.
Interestingly the malware is also called Suspected_Malware.exe in IDA but later called SUSPECTED-MALWARE.exe in the sandbox.
The IDA freeware program allows you to read the program as machine code, somehow Saara doesn’t notice that the program is written to never run the functions or “garbage” she is looking at, despite the fact IDA would have clearly annotated this.
The software reverser Phill says that the garbage is to “confuse the look of the code so the antivirus software won’t recognise it as malware” which sort of makes sense, what he means is that it will change the signature of the program so the antivirus would not be able to detect the program as a known signature or the program behaviours are different than what the antivirus is designed to detect. Again, something Saara would probably know.
She is offered the opportunity to use their test environment, where she incorrectly corrects him about calling it a sandbox.
When she actually runs the program in the sandbox, it errors out and says it can’t run, which the reversing engineer (Phill) says to try to emulate actual user behaviour to see if you can trick it into running, but this is bad advice because they can just reverse the program to determine what is stopping the program from running!
Again, something Saara should understand and already know. “Paste in some word documents, scroll around a bit” lol, once again they have IDA so would be able to determine exactly what is required to cause this behaviour,
Imagine you are reading a book, but you don’t have time to read all of it, and you really just want to know why the main character’s favourite colour is red, you know that on page 20 they say their favourite colour is red, if we try to shoe-horn IDA into this analogy, we would get a direct reference to where the character grew up with a red front door, and that is why their favourite colour is red.
Programs need references in the code to establish behaviours, so when it throws up an error, they can just look through the code, find the error in the code, and trace it back to determine what caused the program to realise it was in a sandbox and prevent it from running, this is basic usage for IDA, its what it is designed to do.
Trying to “Paste in some word documents, scroll around a bit” is like trying to mow a lawn with scissors when you have a lawnmower, ineffective and poor use of the tooling they have.
Its also very unlikely an intern would be vetted enough to have this level of access.
Fear of Attribution
At one point, Danny (Simon Pegg) is reluctant to assign attribution of the malware, this is generally a good call, because it is a technique that advanced persistent threats would use, to implant false clues to assign attribution to a different adversary to throw off investigators. The show talks about Russian bots as well, a real-world issue.
Danny also is chastised for running stressing infrastructure against the network, running this type of test against a production environment during peak hours is a terrible idea.
The hack is also able to take down some parts of the web but leaves others up, this is odd, it may be technically possible however practically all of these systems will themselves have both redundancy and disaster recovery to bring the systems back online, especially products with SLA agreements with their customers.
Many of these systems would be hosted in clouds like AWS or Azure and generally have mechanisms built-in to prevent a global outage based on a single point of failure like a country going down, if a BGP route went down, for example it would not take too long before everything would be re-established through a new route.
Reversing Libraries
At around 28 minutes in, Phill laughs as Saara has reverse-engineered a library saying that “we’ve all done it”, but practically it is almost certainly a good idea, you can probably determine that a program is using a library and probably even check it against a known hash of the library.
The department missing this crucial part of the code by not looking is negligent and certainly something they would have done. They are looking for exactly what she has found, they aren’t looking for something else, so it is odd that they would discount her abilities, its a team effort.
The program opens a URL shortner link https://url.short/41e which isn’t a valid top level domain name, to run some code, which could run anything.